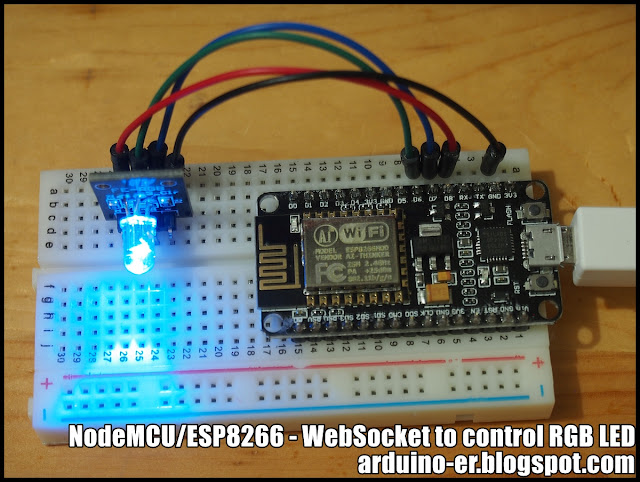
In the previous example "NodeMCU/ESP8266 act as AP (Access Point) and web server to control GPIO", every time user click to change GPIO the page will be reloaded. This example use WebSocket, such that no need reload page.
Add WebSockets library to Arduino Software. To run on ESP devices, add version 2.x.x.
reference: https://github.com/Links2004/arduinoWebSockets
Open WebSockets example WebSocketServer_LEDcontrol. It's a WebSocketServer example to control RGB LED.
In my case, it cannot connect to my HotSpot shared by ASUS Zenfone 2 running Android 5.0! So I modify it to act as Access Point (AP).
WebSocketServer_LEDcontrol.ino
/*
 * WebSocketServer_LEDcontrol.ino
 *
 *  Created on: 26.11.2015
 *
 */
//Modified to act as AP
//arduino-er.blogspot.com

#include <Arduino.h>

#include <ESP8266WiFi.h>
#include <ESP8266WiFiMulti.h>
#include <WebSocketsServer.h>
#include <ESP8266WebServer.h>
#include <ESP8266mDNS.h>
#include <Hash.h>

#define LED_RED     15
#define LED_GREEN   12
#define LED_BLUE    13

#define USE_SERIAL Serial


ESP8266WiFiMulti WiFiMulti;

ESP8266WebServer server = ESP8266WebServer(80);
WebSocketsServer webSocket = WebSocketsServer(81);

void webSocketEvent(uint8_t num, WStype_t type, uint8_t * payload, size_t lenght) {

    switch(type) {
        case WStype_DISCONNECTED:
            USE_SERIAL.printf("[%u] Disconnected!\n", num);
            break;
        case WStype_CONNECTED: {
            IPAddress ip = webSocket.remoteIP(num);
            USE_SERIAL.printf("[%u] Connected from %d.%d.%d.%d url: %s\n", num, ip[0], ip[1], ip[2], ip[3], payload);

            // send message to client
            webSocket.sendTXT(num, "Connected");
        }
            break;
        case WStype_TEXT:
            USE_SERIAL.printf("[%u] get Text: %s\n", num, payload);

            if(payload[0] == '#') {
                // we get RGB data

                // decode rgb data
                uint32_t rgb = (uint32_t) strtol((const char *) &payload[1], NULL, 16);

                analogWrite(LED_RED,    ((rgb >> 16) & 0xFF));
                analogWrite(LED_GREEN,  ((rgb >> 8) & 0xFF));
                analogWrite(LED_BLUE,   ((rgb >> 0) & 0xFF));
            }

            break;
    }

}

void setup() {
    //USE_SERIAL.begin(921600);
    USE_SERIAL.begin(115200);

    //USE_SERIAL.setDebugOutput(true);

    USE_SERIAL.println();
    USE_SERIAL.println();
    USE_SERIAL.println();

    for(uint8_t t = 4; t > 0; t--) {
        USE_SERIAL.printf("[SETUP] BOOT WAIT %d...\n", t);
        USE_SERIAL.flush();
        delay(1000);
    }

    pinMode(LED_RED, OUTPUT);
    pinMode(LED_GREEN, OUTPUT);
    pinMode(LED_BLUE, OUTPUT);

    digitalWrite(LED_RED, 1);
    digitalWrite(LED_GREEN, 1);
    digitalWrite(LED_BLUE, 1);

    /*
    WiFiMulti.addAP("SSID", "passpasspass");

    while(WiFiMulti.run() != WL_CONNECTED) {
        delay(100);
    }
    */

    WiFi.softAP("arduino-er", "12345678");
    IPAddress myIP = WiFi.softAPIP();
    USE_SERIAL.print("AP IP address: ");
    USE_SERIAL.println(myIP);

    // start webSocket server
    webSocket.begin();
    webSocket.onEvent(webSocketEvent);

    if(MDNS.begin("esp8266")) {
        USE_SERIAL.println("MDNS responder started");
    }

    // handle index
    server.on("/", []() {
        // send index.html
        // replace for better looking
        server.send(200, "text/html",
        "<html><head><script>"
        "var connection = new WebSocket('ws://'+location.hostname+':81/', ['arduino']);"
        "connection.onopen = function () {  connection.send('Connect ' + new Date()); };"
        "connection.onerror = function (error) {    console.log('WebSocket Error ', error);};"
        "connection.onmessage = function (e) {  console.log('Server: ', e.data);};"
        "function sendRGB() {  "
        "var r = parseInt(document.getElementById('r').value).toString(16);  "
        "var g = parseInt(document.getElementById('g').value).toString(16);  "
        "var b = parseInt(document.getElementById('b').value).toString(16);  "
        "if(r.length < 2) { r = '0' + r; }   "
        "if(g.length < 2) { g = '0' + g; }   "
        "if(b.length < 2) { b = '0' + b; }   "
        "var rgb = '#'+r+g+b;    "
        "console.log('RGB: ' + rgb); "
        "connection.send(rgb); }"
        "</script></head><body>"
        "LED Control:<br/><br/>"
        "R: ""<input id=\"r\" type=\"range\" min=\"0\" max=\"255\" step=\"1\" onchange=\"sendRGB();\" /><br/>"
        "G: <input id=\"g\" type=\"range\" min=\"0\" max=\"255\" step=\"1\" onchange=\"sendRGB();\" /><br/>"
        "B: <input id=\"b\" type=\"range\" min=\"0\" max=\"255\" step=\"1\" onchange=\"sendRGB();\" /><br/>"
        "</body></html>");
    });

    server.begin();

    // Add service to MDNS
    MDNS.addService("http", "tcp", 80);
    MDNS.addService("ws", "tcp", 81);

    digitalWrite(LED_RED, 0);
    digitalWrite(LED_GREEN, 0);
    digitalWrite(LED_BLUE, 0);

}

void loop() {
    webSocket.loop();
    server.handleClient();
}
Connection:
Connect your mobile to the AP "arduino-er" with password "12345678", open browser and visit IP 192.168.4.1. Then you can control the RGB LED in web page. As shown in the video, more than one device can connect to and control the RGB LED at the same time.
This example hard-code the html inside ino. The next example show how to "load html from separate file in flash file system".
- more example of "ESP8266 core for Arduino".
Updated@2017-06-18:
What is WStype_t (WStype_DISCONNECTED, WStype_CONNECTED...)?
WStype_t is:
typedef enum {
    WStype_ERROR,
    WStype_DISCONNECTED,
    WStype_CONNECTED,
    WStype_TEXT,
    WStype_BIN
} WStype_t;
Should be defined at your Documents\Arduino\libraries\WebSockets\src\WebSockets.h
You should have a example at File > Examples > WebSockets > WebSocketClient to show how to use it.


Nice job ! TNX !
ReplyDeleteGood Work brother..
ReplyDeleteThank you very much. this so inspire me
Thanks for the tutorial!
ReplyDeleteI was just playing with it and discovered that the analogWrite function on ESP8266 defaults to 1023 full scale so the current code only puts out 25% duty cycle max.. To get it to full scale you can map the outputs like this:
analogWrite(LED_RED, map(((rgb >> 16) & 0xFF),0,255,0,1023));
analogWrite(LED_GREEN, map(((rgb >> 8) & 0xFF),0,255,0,1023));
analogWrite(LED_BLUE, map(((rgb >> 0) & 0xFF),0,255,0,1023));
thx for your comment:)
DeleteNice, Very nice.
ReplyDeleteGood job you did here.
Thanks for sharing this thing that got me pointed in the right direction. Much appreciated.
ReplyDeleteThank you a lot~
ReplyDeletewhy it's show disconnect when i connected.
ReplyDeleteHow U do went I have 12v and rgb ground in led
ReplyDeletethanks