/*
    Video: https://www.youtube.com/watch?v=oCMOYS71NIU
    Based on Neil Kolban example for IDF: https://github.com/nkolban/esp32-snippets/blob/master/cpp_utils/tests/BLE%20Tests/SampleNotify.cpp
    Ported to Arduino ESP32 by Evandro Copercini
    updated by chegewara

   Create a BLE server that, once we receive a connection, will send periodic notifications.
   The service advertises itself as: 4fafc201-1fb5-459e-8fcc-c5c9c331914b
   And has a characteristic of: beb5483e-36e1-4688-b7f5-ea07361b26a8

   The design of creating the BLE server is:
   1. Create a BLE Server
   2. Create a BLE Service
   3. Create a BLE Characteristic on the Service
   4. Create a BLE Descriptor on the characteristic
   5. Start the service.
   6. Start advertising.

   A connect hander associated with the server starts a background task that performs notification
   every couple of seconds.
*/
#include <BLEDevice.h>
#include <BLEServer.h>
#include <BLEUtils.h>
#include <BLE2902.h>

BLEServer* pServer = NULL;
BLECharacteristic* pCharacteristic = NULL;
bool deviceConnected = false;
bool oldDeviceConnected = false;
uint32_t value = 0;

// See the following for generating UUIDs:
// https://www.uuidgenerator.net/

#define SERVICE_UUID        "4fafc201-1fb5-459e-8fcc-c5c9c331914b"
#define CHARACTERISTIC_UUID "beb5483e-36e1-4688-b7f5-ea07361b26a8"


class MyServerCallbacks: public BLEServerCallbacks {
    void onConnect(BLEServer* pServer) {
      deviceConnected = true;
    };

    void onDisconnect(BLEServer* pServer) {
      deviceConnected = false;
    }
};


void setup() {
  Serial.begin(115200);

  // Create the BLE Device
  BLEDevice::init("ESP32");

  // Create the BLE Server
  pServer = BLEDevice::createServer();
  pServer->setCallbacks(new MyServerCallbacks());

  // Create the BLE Service
  BLEService *pService = pServer->createService(SERVICE_UUID);

  // Create a BLE Characteristic
  pCharacteristic = pService->createCharacteristic(
                      CHARACTERISTIC_UUID,
                      BLECharacteristic::PROPERTY_READ   |
                      BLECharacteristic::PROPERTY_WRITE  |
                      BLECharacteristic::PROPERTY_NOTIFY |
                      BLECharacteristic::PROPERTY_INDICATE
                    );

  // https://www.bluetooth.com/specifications/gatt/viewer?attributeXmlFile=org.bluetooth.descriptor.gatt.client_characteristic_configuration.xml
  // Create a BLE Descriptor
  pCharacteristic->addDescriptor(new BLE2902());

  // Start the service
  pService->start();

  // Start advertising
  BLEAdvertising *pAdvertising = BLEDevice::getAdvertising();
  pAdvertising->addServiceUUID(SERVICE_UUID);
  pAdvertising->setScanResponse(false);
  pAdvertising->setMinPreferred(0x0);  // set value to 0x00 to not advertise this parameter
  BLEDevice::startAdvertising();
  Serial.println("Waiting a client connection to notify...");
}

void loop() {
    // notify changed value
    if (deviceConnected) {
        pCharacteristic->setValue((uint8_t*)&value, 4);
        pCharacteristic->notify();
        value++;
        delay(3); // bluetooth stack will go into congestion, if too many packets are sent, in 6 hours test i was able to go as low as 3ms
    }
    // disconnecting
    if (!deviceConnected && oldDeviceConnected) {
        delay(500); // give the bluetooth stack the chance to get things ready
        pServer->startAdvertising(); // restart advertising
        Serial.println("start advertising");
        oldDeviceConnected = deviceConnected;
    }
    // connecting
    if (deviceConnected && !oldDeviceConnected) {
        // do stuff here on connecting
        oldDeviceConnected = deviceConnected;
    }
}
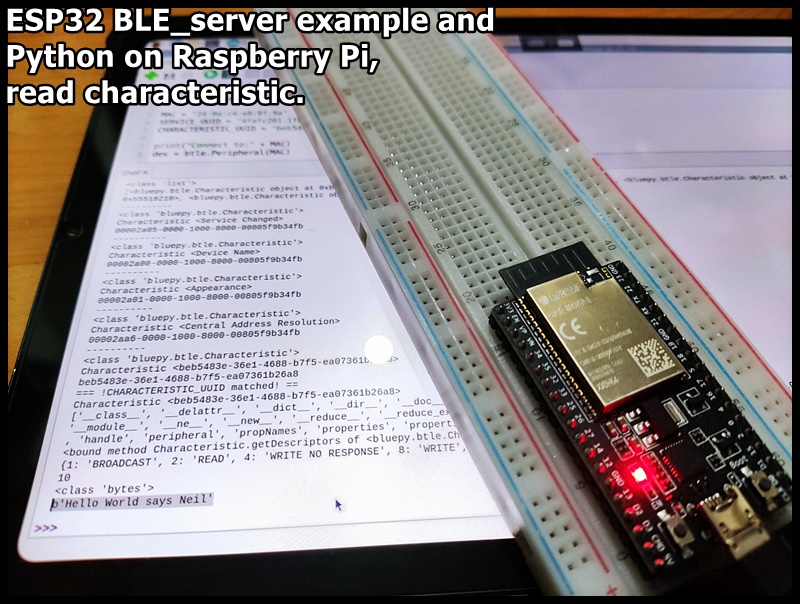
In Arduino Ide, Examples > ESP32 BLE Arduino > BLE_server is a simple BLE server for ESP32. This video show it run on ESP32-DevKitC V4, read the Characteristic "Hello World says Neil" using Python on Raspberry Pi.
BLE_server.ino
/*
    Based on Neil Kolban example for IDF:
    https://github.com/nkolban/esp32-snippets/blob/master/cpp_utils/tests/BLE%20Tests/SampleServer.cpp
    Ported to Arduino ESP32 by Evandro Copercini
    updates by chegewara
*/

#include <BLEDevice.h>
#include <BLEUtils.h>
#include <BLEServer.h>

// See the following for generating UUIDs:
// https://www.uuidgenerator.net/

#define SERVICE_UUID        "4fafc201-1fb5-459e-8fcc-c5c9c331914b"
#define CHARACTERISTIC_UUID "beb5483e-36e1-4688-b7f5-ea07361b26a8"

void setup() {
  Serial.begin(115200);
  Serial.println("Starting BLE work!");

  BLEDevice::init("Long name works now");
  BLEServer *pServer = BLEDevice::createServer();
  BLEService *pService = pServer->createService(SERVICE_UUID);
  BLECharacteristic *pCharacteristic = pService->createCharacteristic(
                                         CHARACTERISTIC_UUID,
                                         BLECharacteristic::PROPERTY_READ |
                                         BLECharacteristic::PROPERTY_WRITE
                                       );

  pCharacteristic->setValue("Hello World says Neil");
  pService->start();
  // BLEAdvertising *pAdvertising = pServer->getAdvertising();
  // this still is working for backward compatibility
  BLEAdvertising *pAdvertising = BLEDevice::getAdvertising();
  pAdvertising->addServiceUUID(SERVICE_UUID);
  pAdvertising->setScanResponse(true);
  pAdvertising->setMinPreferred(0x06);  // functions that help with iPhone connections issue
  pAdvertising->setMinPreferred(0x12);
  BLEDevice::startAdvertising();
  Serial.println("Characteristic defined! Now you can read it in your phone!");
}

void loop() {
  // put your main code here, to run repeatedly:
  delay(2000);
}
BLE_client:
You can also program Examples > ESP32 BLE Arduino > BLE_client on another ESP32 to access the BLE_server.
After powered up, BLE_client to read and change the characteristic value.
BLE_client.ino
/**
 * A BLE client example that is rich in capabilities.
 * There is a lot new capabilities implemented.
 * author unknown
 * updated by chegewara
 */

#include "BLEDevice.h"
//#include "BLEScan.h"

// The remote service we wish to connect to.
static BLEUUID serviceUUID("4fafc201-1fb5-459e-8fcc-c5c9c331914b");
// The characteristic of the remote service we are interested in.
static BLEUUID    charUUID("beb5483e-36e1-4688-b7f5-ea07361b26a8");

static boolean doConnect = false;
static boolean connected = false;
static boolean doScan = false;
static BLERemoteCharacteristic* pRemoteCharacteristic;
static BLEAdvertisedDevice* myDevice;

static void notifyCallback(
  BLERemoteCharacteristic* pBLERemoteCharacteristic,
  uint8_t* pData,
  size_t length,
  bool isNotify) {
    Serial.print("Notify callback for characteristic ");
    Serial.print(pBLERemoteCharacteristic->getUUID().toString().c_str());
    Serial.print(" of data length ");
    Serial.println(length);
    Serial.print("data: ");
    Serial.println((char*)pData);
}

class MyClientCallback : public BLEClientCallbacks {
  void onConnect(BLEClient* pclient) {
  }

  void onDisconnect(BLEClient* pclient) {
    connected = false;
    Serial.println("onDisconnect");
  }
};

bool connectToServer() {
    Serial.print("Forming a connection to ");
    Serial.println(myDevice->getAddress().toString().c_str());

    BLEClient*  pClient  = BLEDevice::createClient();
    Serial.println(" - Created client");

    pClient->setClientCallbacks(new MyClientCallback());

    // Connect to the remove BLE Server.
    pClient->connect(myDevice);
    // if you pass BLEAdvertisedDevice instead of address,
    // it will be recognized type of peer device address (public or private)
    Serial.println(" - Connected to server");

    // Obtain a reference to the service we are after in the remote BLE server.
    BLERemoteService* pRemoteService = pClient->getService(serviceUUID);
    if (pRemoteService == nullptr) {
      Serial.print("Failed to find our service UUID: ");
      Serial.println(serviceUUID.toString().c_str());
      pClient->disconnect();
      return false;
    }
    Serial.println(" - Found our service");


    // Obtain a reference to the characteristic in the service of the remote BLE server.
    pRemoteCharacteristic = pRemoteService->getCharacteristic(charUUID);
    if (pRemoteCharacteristic == nullptr) {
      Serial.print("Failed to find our characteristic UUID: ");
      Serial.println(charUUID.toString().c_str());
      pClient->disconnect();
      return false;
    }
    Serial.println(" - Found our characteristic");

    // Read the value of the characteristic.
    if(pRemoteCharacteristic->canRead()) {
      std::string value = pRemoteCharacteristic->readValue();
      Serial.print("The characteristic value was: ");
      Serial.println(value.c_str());
    }

    if(pRemoteCharacteristic->canNotify())
      pRemoteCharacteristic->registerForNotify(notifyCallback);

    connected = true;
    return true;
}
/**
 * Scan for BLE servers and find the first one that advertises
 * the service we are looking for.
 */
class MyAdvertisedDeviceCallbacks: public BLEAdvertisedDeviceCallbacks {
 /**
   * Called for each advertising BLE server.
   */
  void onResult(BLEAdvertisedDevice advertisedDevice) {
    Serial.print("BLE Advertised Device found: ");
    Serial.println(advertisedDevice.toString().c_str());

    // We have found a device,
    // let us now see if it contains the service we are looking for.
    if (advertisedDevice.haveServiceUUID() &&
			advertisedDevice.isAdvertisingService(serviceUUID)) {

      BLEDevice::getScan()->stop();
      myDevice = new BLEAdvertisedDevice(advertisedDevice);
      doConnect = true;
      doScan = true;

    } // Found our server
  } // onResult
}; // MyAdvertisedDeviceCallbacks


void setup() {
  Serial.begin(115200);
  Serial.println("Starting Arduino BLE Client application...");
  BLEDevice::init("");

  // Retrieve a Scanner and set the callback we want to use to be informed when we
  // have detected a new device.  Specify that we want active scanning and start the
  // scan to run for 5 seconds.
  BLEScan* pBLEScan = BLEDevice::getScan();
  pBLEScan->setAdvertisedDeviceCallbacks(new MyAdvertisedDeviceCallbacks());
  pBLEScan->setInterval(1349);
  pBLEScan->setWindow(449);
  pBLEScan->setActiveScan(true);
  pBLEScan->start(5, false);
} // End of setup.


// This is the Arduino main loop function.
void loop() {

  // If the flag "doConnect" is true then we have scanned for and found the desired
  // BLE Server with which we wish to connect.  Now we connect to it.  Once we are
  // connected we set the connected flag to be true.
  if (doConnect == true) {
    if (connectToServer()) {
      Serial.println("We are now connected to the BLE Server.");
    } else {
      Serial.println("We have failed to connect to the server; there is nothin more we will do.");
    }
    doConnect = false;
  }

  // If we are connected to a peer BLE Server,
  // update the characteristic each time we are reached
  // with the current time since boot.
  if (connected) {
    String newValue = "Time since boot: " + String(millis()/1000);
    Serial.println("Setting new characteristic value to \"" + newValue + "\"");

    // Set the characteristic's value to be the array of bytes that is actually a string.
    pRemoteCharacteristic->writeValue(newValue.c_str(), newValue.length());
  }else if(doScan){
    BLEDevice::getScan()->start(0);
    // this is just eample to start scan after disconnect,
    // most likely there is better way to do it in arduino
  }

  delay(1000); // Delay a second between loops.
} // End of loop
The code run on NodeMCU-32S (ESP32 in Arduino framework) capture analog input in background base on timer interrupt, display on SPI ILI9341 screen graphically.
The timer interrupt is prepared in setup(), refer to Arduino IDE Examples > ESP32 > Timer > RepeatTimer.
bfr[][] is a 2x300 double buffer to store captured analog data. When one page (300 elements) is filled in interrupt service routine, it will switch to fill the another page and set bfr_filled flag to display the filled page in main loop(). Such that the main loop have to finish display within one page filled, 300 x sampling interval.
ESP32_AIN_TmrInt_20210112b.ino
#include "SPI.h"

#include "TFT_eSPI.h"
#define TFT_GREY 0x7BEF

TFT_eSPI myGLCD = TFT_eSPI();

#define FRAME_TOPX    10
#define FRAME_TOPY    5
#define FRAME_WIDTH   300
#define FRAME_HEIGHT  200
#define FRAME_BOTTOMY FRAME_TOPY + FRAME_HEIGHT

#define LAMP_PLOTTING_X FRAME_TOPX+290
#define LAMP_PLOTTING_Y FRAME_BOTTOMY+10
#define LAMP_PLOTTING_R 5

#define NO_OF_BFR_PAGE  2
#define NO_OF_BFR_ELE   300
unsigned int bfr[NO_OF_BFR_PAGE][NO_OF_BFR_ELE];
volatile int   bfr_page;
volatile int   bfr_idx;
volatile bool  bfr_filled;
volatile int   bfr_filled_page;
volatile bool  bfr_run = false;

volatile int   updateDot = -1;
volatile unsigned long prvSamplingTime;
#define PrgressDot_X  FRAME_TOPX
#define PrgressDot_Y  FRAME_BOTTOMY+4

#define PinAnalogIn 36

unsigned long previousTime = 0;

hw_timer_t * timer = NULL;
volatile SemaphoreHandle_t timerSemaphore;

void IRAM_ATTR onTimer(){
  toFillBfr();
  // Give a semaphore that we can check in the loop
  xSemaphoreGiveFromISR(timerSemaphore, NULL);
}

void setup() {

  Serial.begin(115200);
  myGLCD.init();
  myGLCD.setRotation(1);
  myGLCD.fillScreen(TFT_BLACK);
  delay(500);
  myGLCD.fillRect(FRAME_TOPX-1, FRAME_TOPY-1,
                  FRAME_WIDTH+2, FRAME_HEIGHT+2, TFT_WHITE);
  myGLCD.fillRect(FRAME_TOPX, FRAME_TOPY,
                  FRAME_WIDTH, FRAME_HEIGHT, TFT_GREY);

  myGLCD.setTextColor(TFT_WHITE,TFT_BLACK);
  myGLCD.drawString("Double Buffer", FRAME_TOPX, FRAME_BOTTOMY+20);

  // prepare bfr
  bfr_run = false;
  bfr_filled = false;
  bfr_page = 0;
  bfr_idx = 0;
  bfr_run = true;

  // --- Prepare Timer Intrrupt ---
  // Create semaphore to inform us when the timer has fired
  timerSemaphore = xSemaphoreCreateBinary();

  // Use 1st timer of 4 (counted from zero).
  // Set 80 divider for prescaler (see ESP32 Technical Reference Manual for more
  // info).
  timer = timerBegin(0, 80, true);

  // Attach onTimer function to our timer.
  timerAttachInterrupt(timer, &onTimer, true);

  // Set alarm to call onTimer function every second (value in microseconds).
  // Repeat the alarm (third parameter)
  timerAlarmWrite(timer, 10000, true);  //10ms
  //timerAlarmWrite(timer, 1000, true);   //1ms

  // Start an alarm
  timerAlarmEnable(timer);
  prvSamplingTime = micros();
  // --- End of Prepare Timer Intrrupt ---

  Serial.println("\n --- Start ---\n");
  Serial.println("CPU Frequency (Mhz): " + String(getCpuFrequencyMhz()));
}

void handle_screen(){
  if(bfr_filled){
    //unsigned long beforeScreen = micros();

    bfr_filled = false;
    myGLCD.fillCircle(LAMP_PLOTTING_X, LAMP_PLOTTING_Y, LAMP_PLOTTING_R, TFT_RED);

    myGLCD.fillRect(FRAME_TOPX, FRAME_TOPY,
                  FRAME_WIDTH, FRAME_HEIGHT, TFT_GREY);
    int yPrv = bfr[bfr_filled_page][0];
    for(int i=1; i<NO_OF_BFR_ELE; i++){
      int yCur = bfr[bfr_filled_page][i];
      myGLCD.drawLine(FRAME_TOPX+i-1, FRAME_BOTTOMY-yPrv,
                      FRAME_TOPX+i, FRAME_BOTTOMY-yCur,
                      TFT_WHITE);
      yPrv = yCur;

    }

    myGLCD.fillCircle(LAMP_PLOTTING_X, LAMP_PLOTTING_Y, LAMP_PLOTTING_R, TFT_GREEN);
    myGLCD.drawLine(PrgressDot_X, PrgressDot_Y, PrgressDot_X+299, PrgressDot_Y, TFT_BLACK);

    //Serial.println("Fil duration: " + String(micros()-beforeScreen) + " (microsecond)");
  }

  //to draw alblue line under the graph for indicate the sample progress
  if(int x=updateDot){
    updateDot = -1;
    myGLCD.drawPixel(PrgressDot_X+x, PrgressDot_Y, TFT_BLUE);
  }

}

void loop() {

  if (xSemaphoreTake(timerSemaphore, 0) == pdTRUE){
    handle_screen();
  }
}

void toFillBfr(){
  //unsigned long beforeFill = micros();

  unsigned long int curSamplingTime = micros();

  if(bfr_run){
    bfr[bfr_page][bfr_idx] = map(analogRead(PinAnalogIn),0, 4096, 0, 200);

    updateDot = bfr_idx;
    bfr_idx++;

    if(bfr_idx >= NO_OF_BFR_ELE){
      bfr_filled_page = bfr_page;
      bfr_idx=0;
      if(bfr_page==0){
        bfr_page = 1;
      }else{
        bfr_page = 0;
      }
      bfr_filled = true;
    }
  }

  //Send sampling interval to Serial Monitor for evaluation only,
  //remove it before finalize.
  Serial.println(curSamplingTime - prvSamplingTime);
  prvSamplingTime = curSamplingTime;

  //Serial.println("Fil duration: " + String(micros()-beforeFill) + " (microsecond)");
}
Exercise run on ESP32 (NodeMCU-32S), Combine the examples of ESP32_SimpleTime and TFT_DIGITAL_CLOCK, get time from ntpServer "pool.ntp.org", and display on 2.4" 320x240 SPI ILI9341 screen in digital clock form.
ESP32_ILI9341_ntp_Clock_Digital_2021-01-10a.ino
/*
 * ESP32_ILI9341_ntp_Clock_Digital
 *
 * Combine the examples of
 * Examples > ESP32 > Time > ESP32_SimpleTime and
 * Examples > TFT_eSPI > 320 x 240 > TFT_DIGITAL_CLOCK
 *
 * Get time from ntpServer "pool.ntp.org",
 * display on SPI ILI9341 screen in digital clock form.
 *
 * You have to change ssid/password to match with your wifi network.
 * and change gmtOffset_sec to match your timezone.
 =========================================================================
 Make sure all the display driver and pin comnenctions are correct by
 editting the User_Setup.h file in the TFT_eSPI library folder.

 #########################################################################
 ###### DON'T FORGET TO UPDATE THE User_Setup.h FILE IN THE LIBRARY ######
 #########################################################################
For using SPI ILI9341 screen on ESP32,
refer Arduino-er: ESP32 + 2.4" 320X240 Display (SPI ILI9341),
using TFT_eSPI, prepare user setup file.
http://arduino-er.blogspot.com/2021/01/esp32-24-320x240-display-spi-ili9341.html

A few colour codes:

code	color
0x0000	Black
0xFFFF	White
0xBDF7	Light Gray
0x7BEF	Dark Gray
0xF800	Red
0xFFE0	Yellow
0xFBE0	Orange
0x79E0	Brown
0x7E0	Green
0x7FF	Cyan
0x1F	Blue
0xF81F	Pink

 */

#include <TFT_eSPI.h> // Hardware-specific library
#include <SPI.h>
#include <WiFi.h>
#include "time.h"


const char* ssid       = "ssid";
const char* password   = "password";

const char* ntpServer = "pool.ntp.org";
//+8 hr@HongKong
//8 * 60 * 60 = 28800
const long  gmtOffset_sec = 28800; //-8hr@Hong Kong
const int   daylightOffset_sec = 3600;

#define TFT_GREY 0x5AEB

TFT_eSPI tft = TFT_eSPI();       // Invoke custom library

uint32_t targetTime = 0;                    // for next 1 second timeout


/* The original example get H, M, S from compile time
static uint8_t conv2d(const char* p); // Forward declaration needed for IDE 1.6.x

uint8_t hh = conv2d(__TIME__), mm = conv2d(__TIME__ + 3),
        ss = conv2d(__TIME__ + 6); // Get H, M, S from compile time
*/

/*
 *  Get H,M, S after ntp server connected,
 *  will load in printLocalTime()
 */
uint8_t hh,mm,ss;


byte omm = 99, oss = 99;
byte xcolon = 0, xsecs = 0;
unsigned int colour = 0;

void printLocalTime()
{
  struct tm timeinfo;
  if(!getLocalTime(&timeinfo)){
    Serial.println("Failed to obtain time");
    return;
  }
  Serial.println(&timeinfo, "%A, %B %d %Y %H:%M:%S");

  /* to read elements from getLocalTime(&timeinfo)
   * ref:
   * http://www.cplusplus.com/reference/ctime/tm/
   */
  int time_yday = timeinfo.tm_yday; //days since January 1
  int time_wday = timeinfo.tm_wday; //days since Sunday
  int time_year = timeinfo.tm_year; // years since 1900
  int time_mon  = timeinfo.tm_mon;   //months since January
  int time_mday = timeinfo.tm_mday; //day of the month
  int time_hr   = timeinfo.tm_hour;
  int time_min  = timeinfo.tm_min;
  int time_sec  = timeinfo.tm_sec;
  Serial.println("tm_yday: " + String(time_yday));
  Serial.println("tm_wday: " + String(time_wday));
  Serial.println("tm_year: " + String(time_year));
  Serial.println("tm_mon:  " + String(time_mon));
  Serial.println("tm_mday: " + String(time_mday));
  Serial.println("tm_hr:   " + String(time_hr));
  Serial.println("tm_min:  " + String(time_min));
  Serial.println("tm_sec:  " + String(time_sec));
  hh = time_hr;
  mm = time_min;
  ss = time_sec;
}

void setup(void) {
  Serial.begin(115200);
  /*
   * Connect to WiFi, and get time from ntpServer
   * To simplify, only once when power-up.
   */
  //connect to WiFi
  Serial.printf("Connecting to %s ", ssid);
  WiFi.begin(ssid, password);
  while (WiFi.status() != WL_CONNECTED) {
      delay(500);
      Serial.print(".");
  }
  Serial.println(" CONNECTED");

  //init and get the time
  configTime(gmtOffset_sec, daylightOffset_sec, ntpServer);
  printLocalTime();

  //disconnect WiFi as it's no longer needed
  WiFi.disconnect(true);
  WiFi.mode(WIFI_OFF);

  /*
   * Prepare for TFT
   */
  tft.init();
  tft.setRotation(1);
  tft.fillScreen(TFT_BLACK);

  tft.setTextSize(1);
  tft.setTextColor(TFT_YELLOW, TFT_BLACK);

  targetTime = millis() + 1000;
}

void loop() {
  if (targetTime < millis()) {
    // Set next update for 1 second later
    targetTime = millis() + 1000;

    // Adjust the time values by adding 1 second
    ss++;              // Advance second
    if (ss == 60) {    // Check for roll-over
      ss = 0;          // Reset seconds to zero
      omm = mm;        // Save last minute time for display update
      mm++;            // Advance minute
      if (mm > 59) {   // Check for roll-over
        mm = 0;
        hh++;          // Advance hour
        if (hh > 23) { // Check for 24hr roll-over (could roll-over on 13)
          hh = 0;      // 0 for 24 hour clock, set to 1 for 12 hour clock
        }
      }
    }


    // Update digital time
    int xpos = 0;
    int ypos = 85; // Top left corner ot clock text, about half way down
    int ysecs = ypos + 24;

    if (omm != mm) { // Redraw hours and minutes time every minute
      omm = mm;
      // Draw hours and minutes
      if (hh < 10) xpos += tft.drawChar('0', xpos, ypos, 8); // Add hours leading zero for 24 hr clock
      xpos += tft.drawNumber(hh, xpos, ypos, 8);             // Draw hours
      xcolon = xpos; // Save colon coord for later to flash on/off later
      xpos += tft.drawChar(':', xpos, ypos - 8, 8);
      if (mm < 10) xpos += tft.drawChar('0', xpos, ypos, 8); // Add minutes leading zero
      xpos += tft.drawNumber(mm, xpos, ypos, 8);             // Draw minutes
      xsecs = xpos; // Sae seconds 'x' position for later display updates
    }
    if (oss != ss) { // Redraw seconds time every second
      oss = ss;
      xpos = xsecs;

      if (ss % 2) { // Flash the colons on/off
        tft.setTextColor(0x39C4, TFT_BLACK);        // Set colour to grey to dim colon
        tft.drawChar(':', xcolon, ypos - 8, 8);     // Hour:minute colon
        xpos += tft.drawChar(':', xsecs, ysecs, 6); // Seconds colon
        tft.setTextColor(TFT_YELLOW, TFT_BLACK);    // Set colour back to yellow
      }
      else {
        tft.drawChar(':', xcolon, ypos - 8, 8);     // Hour:minute colon
        xpos += tft.drawChar(':', xsecs, ysecs, 6); // Seconds colon
      }

      //Draw seconds
      if (ss < 10) xpos += tft.drawChar('0', xpos, ysecs, 6); // Add leading zero
      tft.drawNumber(ss, xpos, ysecs, 6);                     // Draw seconds
    }
  }
}

/*
// Function to extract numbers from compile time string
static uint8_t conv2d(const char* p) {
  uint8_t v = 0;
  if ('0' <= *p && *p <= '9')
    v = *p - '0';
  return 10 * v + *++p - '0';
}
*/
Reading the TFT_eSPI GitHub page, if you update TFT_eSPI then it will over-write your setups if they are kept within the TFT_eSPI folder. It's suggested to create a new folder in your Arduino library folder called "TFT_eSPI_Setups". You then place your custom setup.h files in there. After an upgrade simply edit the User_Setup_Select.h file to point to your custom setup file.
Here is how to prepare my custom setup file for using SPI ILI9341 on ESP32 (NodeMCU-32S).
- Create a new folder in your Arduino library folder called "TFT_eSPI_Setups"
- Copy default User_Setup.h (checked it match with using SPI ILI9341) to "TFT_eSPI_Setups" folder, rename it if you want.
- Edit the User_Setup_Select.h file to point to the custom setup file.
- Edit the custom user setup file:
ILI9341_DRIVER is selected by default, keep it no change.
Comment and un-comment the pin assignment code as shown:
Connect the display module to ESP32 dev. board accordingly.