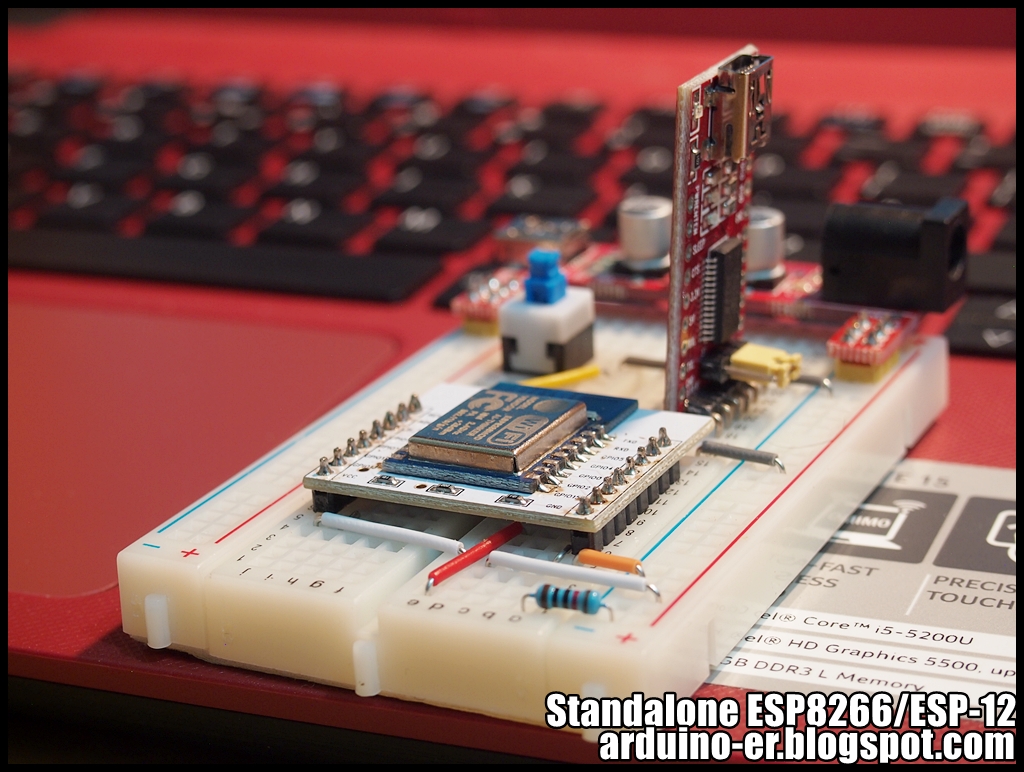
This post show how to program and run standalone ESP8266/ESP-12 WiFi module. To program ESP8266 board with Arduino, we have to "Install ESP8266 Board to Arduino IDE".
Connect USB-to-Serial adapter to ESP8266/ESP-12 board, FT232RL module is used in this example.
To program ESP8266 board, press the button to connect GPIO0 to GND. Because there are no RTS in my FT232RL module, so I have to power OFF and ON to reset ESP8266 before programming.
Once programmed, power off the board, press the button to release GPIO0, then power on again to run in standalone.
Updated@2015-11-15:
My setup have no RTS, so I add a button to reset the ESP-12 manually.
I have a ESP8266 ESP-12 WiFi Module (Full I/O) Breakout Board. But the board cover whole the width of breadboard, such that cannot insert breadboard wire. Alternatively, I have some pre-cut wires for breadboard, can be inserted under the breakout board to make it fit on breadboard.
I also add a breadboard power supply (3.3V selectable), a FTDI adapter and button for flashing firmware. And wires to lead out the GPIO16, 14, 12 and 13 for future use.
Last exercise "Arduino + ESP8266 - a simpe web server response with HTML" use a simple approach to find the "+IPD" in the income stream. But if fail to detect it, the buffer will not be updated, it will stop and need restart. It's another approach using readBytesUntil() to load the data to another buffer, and find "+IPD" programmatically using strncmp(). Such that if fail to detect "+IPD", it still can work for next connection.
In order to know the pattern of "+IPD" and the connection id in the incoming stream, I make a test program to show it in Serial Monitor, refer to the bottom of this post.
Due8266Web.ino
/*
Arduino Due - ESP 8266 WiFi Module
Serial (Tx/Rx) communicate to PC via USB
Serial3 (Tx3/Rx3) connect to ESP8266
Tx3 - ESP8266 Rx
Rx3 - ESP8266 Tx
ESP8266 CH_PD Connect to ESP8266 VCC
*/
#define ASCII_0 48
#define ESP8266 Serial3
String SSID = "TestAP";
String PASSWORD = "12345678";
int LED = 13;
boolean FAIL_8266 = false;
String strHTML = "<!doctype html>\
<html>\
<head>\
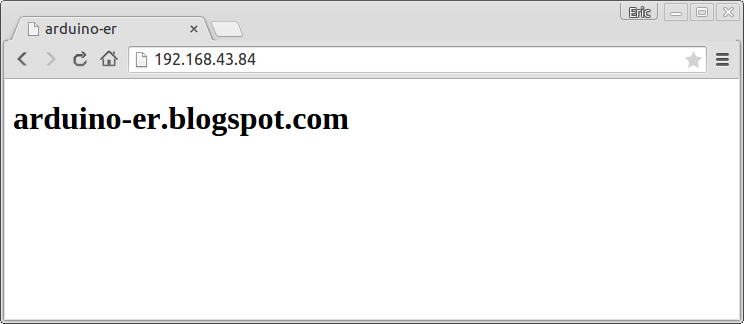
<title>arduino-er</title>\
</head>\
<body>\
<H1>arduino-er.blogspot.com</H1>\
</body>\
</html>";
#define BUFFER_SIZE 128
char buffer[BUFFER_SIZE];
void setup() {
pinMode(LED, OUTPUT);
digitalWrite(LED, LOW);
delay(300);
digitalWrite(LED, HIGH);
delay(200);
digitalWrite(LED, LOW);
delay(300);
digitalWrite(LED, HIGH);
delay(200);
digitalWrite(LED, LOW);
delay(300);
digitalWrite(LED, HIGH);
delay(200);
digitalWrite(LED, LOW);
do{
Serial.begin(9600);
ESP8266.begin(9600);
//Wait Serial Monitor to start
while(!Serial);
Serial.println("--- Start ---");
ESP8266.println("AT+RST");
delay(1000);
if(ESP8266.find("ready"))
{
Serial.println("Module is ready");
ESP8266.println("AT+CWMODE=1");
delay(2000);
//Quit existing AP, for demo
Serial.println("Quit AP");
ESP8266.println("AT+CWQAP");
delay(1000);
clearESP8266SerialBuffer();
if(cwJoinAP())
{
Serial.println("CWJAP Success");
FAIL_8266 = false;
delay(3000);
clearESP8266SerialBuffer();
//Get and display my IP
sendESP8266Cmdln("AT+CIFSR", 1000);
//Set multi connections
sendESP8266Cmdln("AT+CIPMUX=1", 1000);
//Setup web server on port 80
sendESP8266Cmdln("AT+CIPSERVER=1,80",1000);
Serial.println("Server setup finish");
}else{
Serial.println("CWJAP Fail");
delay(500);
FAIL_8266 = true;
}
}else{
Serial.println("Module have no response.");
delay(500);
FAIL_8266 = true;
}
}while(FAIL_8266);
digitalWrite(LED, HIGH);
}
void loop(){
int connectionId;
if(ESP8266.readBytesUntil('\n', buffer, BUFFER_SIZE)>0)
{
Serial.println("Something received");
Serial.println(buffer);
if(strncmp(buffer, "+IPD,", 5)==0){
Serial.println("+IPD, found");
sscanf(buffer+5, "%d", &connectionId);
Serial.println("connectionId: " + String(connectionId));
delay(1000);
clearESP8266SerialBuffer();
sendHTTPResponse(connectionId, strHTML);
//Close TCP/UDP
String cmdCIPCLOSE = "AT+CIPCLOSE=";
cmdCIPCLOSE += connectionId;
sendESP8266Cmdln(cmdCIPCLOSE, 1000);
}
}
}
void sendHTTPResponse(int id, String content)
{
String response;
response = "HTTP/1.1 200 OK\r\n";
response += "Content-Type: text/html; charset=UTF-8\r\n";
response += "Content-Length: ";
response += content.length();
response += "\r\n";
response +="Connection: close\r\n\r\n";
response += content;
String cmd = "AT+CIPSEND=";
cmd += id;
cmd += ",";
cmd += response.length();
Serial.println("--- AT+CIPSEND ---");
sendESP8266Cmdln(cmd, 1000);
Serial.println("--- data ---");
sendESP8266Data(response, 1000);
}
boolean waitOKfromESP8266(int timeout)
{
do{
Serial.println("wait OK...");
delay(1000);
if(ESP8266.find("OK"))
{
return true;
}
}while((timeout--)>0);
return false;
}
boolean cwJoinAP()
{
String cmd="AT+CWJAP=\"" + SSID + "\",\"" + PASSWORD + "\"";
ESP8266.println(cmd);
return waitOKfromESP8266(10);
}
//Send command to ESP8266, assume OK, no error check
//wait some time and display respond
void sendESP8266Cmdln(String cmd, int waitTime)
{
ESP8266.println(cmd);
delay(waitTime);
clearESP8266SerialBuffer();
}
//Basically same as sendESP8266Cmdln()
//But call ESP8266.print() instead of call ESP8266.println()
void sendESP8266Data(String data, int waitTime)
{
ESP8266.print(data);
delay(waitTime);
clearESP8266SerialBuffer();
}
//Clear and display Serial Buffer for ESP8266
void clearESP8266SerialBuffer()
{
Serial.println("= clearESP8266SerialBuffer() =");
while (ESP8266.available() > 0) {
char a = ESP8266.read();
Serial.write(a);
}
Serial.println("==============================");
}
To know the "+IPD" and the connection id, I prepare this simple program to show the incoming data on Serial Monitor, without response back to the client.
testDue8266Web.ino
/*
Arduino Due - ESP 8266 WiFi Module
Serial (Tx/Rx) communicate to PC via USB
Serial3 (Tx3/Rx3) connect to ESP8266
Tx3 - ESP8266 Rx
Rx3 - ESP8266 Tx
ESP8266 CH_PD Connect to ESP8266 VCC
*/
#define ASCII_0 48
#define ESP8266 Serial3
//String SSID = "TestAP";
//String PASSWORD = "12345678";

int LED = 13;

boolean FAIL_8266 = false;

String strHTML = "<!doctype html>\
<html>\
<head>\
<title>arduino-er</title>\
</head>\
<body>\
<H1>arduino-er.blogspot.com</H1>\
</body>\
</html>";

void setup() {
  pinMode(LED, OUTPUT);

  digitalWrite(LED, LOW);
  delay(300);
  digitalWrite(LED, HIGH);
  delay(200);
  digitalWrite(LED, LOW);
  delay(300);
  digitalWrite(LED, HIGH);
  delay(200);
  digitalWrite(LED, LOW);
  delay(300);
  digitalWrite(LED, HIGH);
  delay(200);
  digitalWrite(LED, LOW);

  do{
    Serial.begin(9600);
    ESP8266.begin(9600);

    //Wait Serial Monitor to start
    while(!Serial);
    Serial.println("--- Start ---");

    ESP8266.println("AT+RST");
    delay(1000);
    if(ESP8266.find("ready"))
    {
      Serial.println("Module is ready");
      ESP8266.println("AT+CWMODE=2");
      delay(1000);

      clearESP8266SerialBuffer();
      sendESP8266Cmdln("AT+CIFSR", 1000);
      //Set multi connections
      sendESP8266Cmdln("AT+CIPMUX=1", 1000);
      //Setup web server on port 80
      sendESP8266Cmdln("AT+CIPSERVER=1,80",1000);
      Serial.println("Server setup finish");
    }else{
      Serial.println("Module have no response.");
      delay(500);
      FAIL_8266 = true;
    }
  }while(FAIL_8266);

  digitalWrite(LED, HIGH);
}

void loop(){
  while (ESP8266.available() > 0) {
    char a = ESP8266.read();
    Serial.write(a);
  }
}

boolean waitOKfromESP8266(int timeout)
{
  do{
    Serial.println("wait OK...");
    delay(1000);
    if(ESP8266.find("OK"))
    {
      return true;
    }

  }while((timeout--)>0);
  return false;
}

//Send command to ESP8266, assume OK, no error check
//wait some time and display respond
void sendESP8266Cmdln(String cmd, int waitTime)
{
  ESP8266.println(cmd);
  delay(waitTime);
  clearESP8266SerialBuffer();
}

//Basically same as sendESP8266Cmdln()
//But call ESP8266.print() instead of call ESP8266.println()
void sendESP8266Data(String data, int waitTime)
{
  ESP8266.print(data);
  delay(waitTime);
  clearESP8266SerialBuffer();
}

//Clear and display Serial Buffer for ESP8266
void clearESP8266SerialBuffer()
{
  Serial.println("= clearESP8266SerialBuffer() =");
  while (ESP8266.available() > 0) {
    char a = ESP8266.read();
    Serial.write(a);
  }
  Serial.println("==============================");
}
This example show how to implement a simple web server on Arduino Due with ESP8266 ESP-12 WiFi Module. User visit it with GET method to turn ON/OFF the on-board LED of Arduino Due.
to turn ON LED: http://ipaddress?led=1
to turn OFF LED: http://ipaddress?led=0
This demo run with ESP-12, suppose it work on any ESP8266 module.
In fact, it's not too stable! Sometime will lost if cannot detect "+IPD".
Connection:
ESP-12 VCC connect to separated power of 3.3V
Due GND - ESP-12 GND
Due TX3 - ESP-12 RX
Due RX3 - ESP-12 TX
ESP-12 CH_PD connect to ESP-12 VCC
Due connect with PC USB, such that we can monitor the status of ESP-12.
Start Serial Monitor, at 9600 baud, to reset and start run the program.
Due8266WebControlLed.ino
/*
Arduino Due - ESP 8266 WiFi Module
Serial (Tx/Rx) communicate to PC via USB
Serial3 (Tx3/Rx3) connect to ESP8266
Tx3 - ESP8266 Rx
Rx3 - ESP8266 Tx
ESP8266 CH_PD Connect to ESP8266 VCC
*/

#define ESP8266 Serial3
String SSID = "TestAP";
String PASSWORD = "12345678";

int LED = 13;

boolean FAIL_8266 = false;

void setup() {
  pinMode(LED, OUTPUT);

  digitalWrite(LED, LOW);
  delay(300);
  digitalWrite(LED, HIGH);
  delay(200);
  digitalWrite(LED, LOW);
  delay(300);
  digitalWrite(LED, HIGH);
  delay(200);
  digitalWrite(LED, LOW);
  delay(300);
  digitalWrite(LED, HIGH);
  delay(200);
  digitalWrite(LED, LOW);

  do{
    Serial.begin(9600);
    ESP8266.begin(9600);

    //Wait Serial Monitor to start
    while(!Serial);
    Serial.println("--- Start ---");

    ESP8266.println("AT+RST");
    delay(1000);
    if(ESP8266.find("ready"))
    {
      Serial.println("Module is ready");
      ESP8266.println("AT+CWMODE=1");
      delay(2000);

      //Quit existing AP, for demo
      Serial.println("Quit AP");
      ESP8266.println("AT+CWQAP");
      delay(1000);

      clearESP8266SerialBuffer();
      if(cwJoinAP())
      {
        Serial.println("CWJAP Success");
        FAIL_8266 = false;

        delay(3000);
        clearESP8266SerialBuffer();
        //Get and display my IP
        sendESP8266Cmdln("AT+CIFSR", 1000);
        //Set multi connections
        sendESP8266Cmdln("AT+CIPMUX=1", 1000);
        //Setup web server on port 80
        sendESP8266Cmdln("AT+CIPSERVER=1,80",1000);

        Serial.println("Server setup finish");
      }else{
        Serial.println("CWJAP Fail");
        delay(500);
        FAIL_8266 = true;
      }
    }else{
      Serial.println("Module have no response.");
      delay(500);
      FAIL_8266 = true;
    }
  }while(FAIL_8266);

  digitalWrite(LED, HIGH);
}

void loop(){
  if(ESP8266.available())
  {
    Serial.println("Something received");
    delay(1000);
    if(ESP8266.find("+IPD,"))
    {
      String action;

      Serial.println("+IPD, found");
      int connectionId = ESP8266.read()-48;
      Serial.println("connectionId: " + String(connectionId));

      ESP8266.find("led=");
      char s = ESP8266.read();
      if(s=='0'){
        action = "led=0";
        digitalWrite(LED, LOW);
      }else if(s=='1'){
        action = "led=1";
        digitalWrite(LED, HIGH);
      }else{
        action = "led=?";
      }

      Serial.println(action);
      sendHTTPResponse(connectionId, action);

      //Close TCP/UDP
      String cmdCIPCLOSE = "AT+CIPCLOSE=";
      cmdCIPCLOSE += connectionId;
      sendESP8266Cmdln(cmdCIPCLOSE, 1000);
    }
  }
}

void sendHTTPResponse(int id, String content)
{
  String response;
  response = "HTTP/1.1 200 OK\r\n";
  response += "Content-Type: text/html; charset=UTF-8\r\n";
  response += "Content-Length: ";
  response += content.length();
  response += "\r\n";
  response +="Connection: close\r\n\r\n";
  response += content;

  String cmd = "AT+CIPSEND=";
  cmd += id;
  cmd += ",";
  cmd += response.length();

  Serial.println("--- AT+CIPSEND ---");
  sendESP8266Cmdln(cmd, 1000);

  Serial.println("--- data ---");
  sendESP8266Data(response, 1000);
}

boolean waitOKfromESP8266(int timeout)
{
  do{
    Serial.println("wait OK...");
    delay(1000);
    if(ESP8266.find("OK"))
    {
      return true;
    }

  }while((timeout--)>0);
  return false;
}

boolean cwJoinAP()
{
  String cmd="AT+CWJAP=\"" + SSID + "\",\"" + PASSWORD + "\"";
  ESP8266.println(cmd);
  return waitOKfromESP8266(10);
}

//Send command to ESP8266, assume OK, no error check
//wait some time and display respond
void sendESP8266Cmdln(String cmd, int waitTime)
{
  ESP8266.println(cmd);
  delay(waitTime);
  clearESP8266SerialBuffer();
}

//Basically same as sendESP8266Cmdln()
//But call ESP8266.print() instead of call ESP8266.println()
void sendESP8266Data(String data, int waitTime)
{
  ESP8266.print(data);
  delay(waitTime);
  clearESP8266SerialBuffer();
}

//Clear and display Serial Buffer for ESP8266
void clearESP8266SerialBuffer()
{
  Serial.println("= clearESP8266SerialBuffer() =");
  while (ESP8266.available() > 0) {
    char a = ESP8266.read();
    Serial.write(a);
  }
  Serial.println("==============================");
}