My first try Arduino Web Editor/Arduino 101 with Gyro example. Assume Arduino plug-ins was installed correctly, and Arduino 101 is connect to PC.
The Arduino Web Editor allows you to write code and upload sketches to any official Arduino and Genuino board from your web browser (Chrome, Firefox, Safari and Edge) after installing a plugin (repository available here).
From Arduino IDE with Arduino/Genuino 101 board installed, it's a CallbackLED example to test Arduino/Genuino 101 Bluetooth Low Energy (BLE) capabilities to turn on and of the LED connected to Pin 13 from a Android or iOS.
In Arduino IDE, open and download the CallbackLED example:
- File > Examples > CurieBLE > CallbackLED
CallbackLED.ino
/*
  Copyright (c) 2015 Intel Corporation. All rights reserved.

  This library is free software; you can redistribute it and/or
  modify it under the terms of the GNU Lesser General Public
  License as published by the Free Software Foundation; either
  version 2.1 of the License, or (at your option) any later version.

  This library is distributed in the hope that it will be useful,
  but WITHOUT ANY WARRANTY; without even the implied warranty of
  MERCHANTABILITY or FITNESS FOR A PARTICULAR PURPOSE. See the GNU
  Lesser General Public License for more details.

  You should have received a copy of the GNU Lesser General Public
  License along with this library; if not, write to the Free Software
  Foundation, Inc., 51 Franklin Street, Fifth Floor, Boston, MA 02110-
  1301 USA
*/


#include <CurieBLE.h>

const int ledPin = 13; // set ledPin to use on-board LED
BLEPeripheral blePeripheral; // create peripheral instance

BLEService ledService("19B10000-E8F2-537E-4F6C-D104768A1214"); // create service

// create switch characteristic and allow remote device to read and write
BLECharCharacteristic switchChar("19B10001-E8F2-537E-4F6C-D104768A1214", BLERead | BLEWrite);

void setup() {
  Serial.begin(9600);
  pinMode(ledPin, OUTPUT); // use the LED on pin 13 as an output

  // set the local name peripheral advertises
  blePeripheral.setLocalName("LEDCB");
  // set the UUID for the service this peripheral advertises
  blePeripheral.setAdvertisedServiceUuid(ledService.uuid());

  // add service and characteristic
  blePeripheral.addAttribute(ledService);
  blePeripheral.addAttribute(switchChar);

  // assign event handlers for connected, disconnected to peripheral
  blePeripheral.setEventHandler(BLEConnected, blePeripheralConnectHandler);
  blePeripheral.setEventHandler(BLEDisconnected, blePeripheralDisconnectHandler);

  // assign event handlers for characteristic
  switchChar.setEventHandler(BLEWritten, switchCharacteristicWritten);
// set an initial value for the characteristic
  switchChar.setValue(0);

  // advertise the service
  blePeripheral.begin();
  Serial.println(("Bluetooth device active, waiting for connections..."));
}

void loop() {
  // poll peripheral
  blePeripheral.poll();
}

void blePeripheralConnectHandler(BLECentral& central) {
  // central connected event handler
  Serial.print("Connected event, central: ");
  Serial.println(central.address());
}

void blePeripheralDisconnectHandler(BLECentral& central) {
  // central disconnected event handler
  Serial.print("Disconnected event, central: ");
  Serial.println(central.address());
}

void switchCharacteristicWritten(BLECentral& central, BLECharacteristic& characteristic) {
  // central wrote new value to characteristic, update LED
  Serial.print("Characteristic event, written: ");

  if (switchChar.value()) {
    Serial.println("LED on");
    digitalWrite(ledPin, HIGH);
  } else {
    Serial.println("LED off");
    digitalWrite(ledPin, LOW);
  }
}
On smartphone with BLE, download "nRF Master Control Panel (BLE)" app: nRF Master Control Panel is a powerful generic tool that allows you to scan, advertise and explore your Bluetooth Smart (BLE) devices and communicate with them. nRF MCP supports number of Bluetooth SIG adopted profiles including Device Firmware Update profile (DFU) from Nordic Semiconductors.
- Android
- iOS
Intel releases the source code of the real-time operating system (RTOS) powering the Arduino 101 and Genuino 101 is now available for hacking and study purposes.
It's a tutorial "Arduino/Genuino 101 CurieIMU Orientation Visualiser". This tutorial demonstrates how to make use the Genuino 101's on-board 6-axis accelerometer/gyro to read the X, Y, and Z values of both the accelerometer and the gyroscope. While the accelerometer is able to determine the orientation of the board, the gyroscope measures the angular velocity of the board. Together, the accelerometer and the gyroscope form an Inertial Monitoring Unit (IMU) which can be used to precisely identify the orientation of the board. Madgwick's filter algorithm is used in this example to calculate four quarternions from the 6 axes' values. The quarternions are then used to calculate Euler angles Pitch, Yaw, and Roll, which are received by Processing and used to control the rotation of an object around the X, Y and Z axes.
To try the Gyro function of Arduino/Genuino 101 board, open the CurieIMU Gyro example:
File > Examples > CurieIMU > Gyro
Gyro.ino
/*
   Copyright (c) 2015 Intel Corporation.  All rights reserved.

   This library is free software; you can redistribute it and/or
   modify it under the terms of the GNU Lesser General Public
   License as published by the Free Software Foundation; either
   version 2.1 of the License, or (at your option) any later version.

   This library is distributed in the hope that it will be useful,
   but WITHOUT ANY WARRANTY; without even the implied warranty of
   MERCHANTABILITY or FITNESS FOR A PARTICULAR PURPOSE.  See the GNU
   Lesser General Public License for more details.

   You should have received a copy of the GNU Lesser General Public
   License along with this library; if not, write to the Free Software
   Foundation, Inc., 51 Franklin Street, Fifth Floor, Boston, MA  02110-1301  USA

*/

/*
   This sketch example demonstrates how the BMI160 on the
   Intel(R) Curie(TM) module can be used to read gyroscope data
*/

#include "CurieIMU.h"

void setup() {
  Serial.begin(9600); // initialize Serial communication
  while (!Serial);    // wait for the serial port to open

  // initialize device
  Serial.println("Initializing IMU device...");
  CurieIMU.begin();

  // Set the accelerometer range to 250 degrees/second
  CurieIMU.setGyroRange(250);
}

void loop() {
  int gxRaw, gyRaw, gzRaw;         // raw gyro values
  float gx, gy, gz;

  // read raw gyro measurements from device
  CurieIMU.readGyro(gxRaw, gyRaw, gzRaw);

  // convert the raw gyro data to degrees/second
  gx = convertRawGyro(gxRaw);
  gy = convertRawGyro(gyRaw);
  gz = convertRawGyro(gzRaw);

  // display tab-separated gyro x/y/z values
  Serial.print("g:\t");
  Serial.print(gx);
  Serial.print("\t");
  Serial.print(gy);
  Serial.print("\t");
  Serial.print(gz);
  Serial.println();

  // wait 5 seconds
  delay(5000);
}

float convertRawGyro(int gRaw) {
  // since we are using 250 degrees/seconds range
  // -250 maps to a raw value of -32768
  // +250 maps to a raw value of 32767

  float g = (gRaw * 250.0) / 32768.0;

  return g;
}
Arduino/Genuino 101 CurieIMU Gyro With this tutorial you learn to read the gyroscope raw values and convert them into an angular velocity around each of the three axes. This information is useful to measure rotational movement around the three axes, something that acceleration can't measure if the movement is continuous.
~ reference: https://www.arduino.cc/en/Tutorial/Genuino101CurieIMUGyro
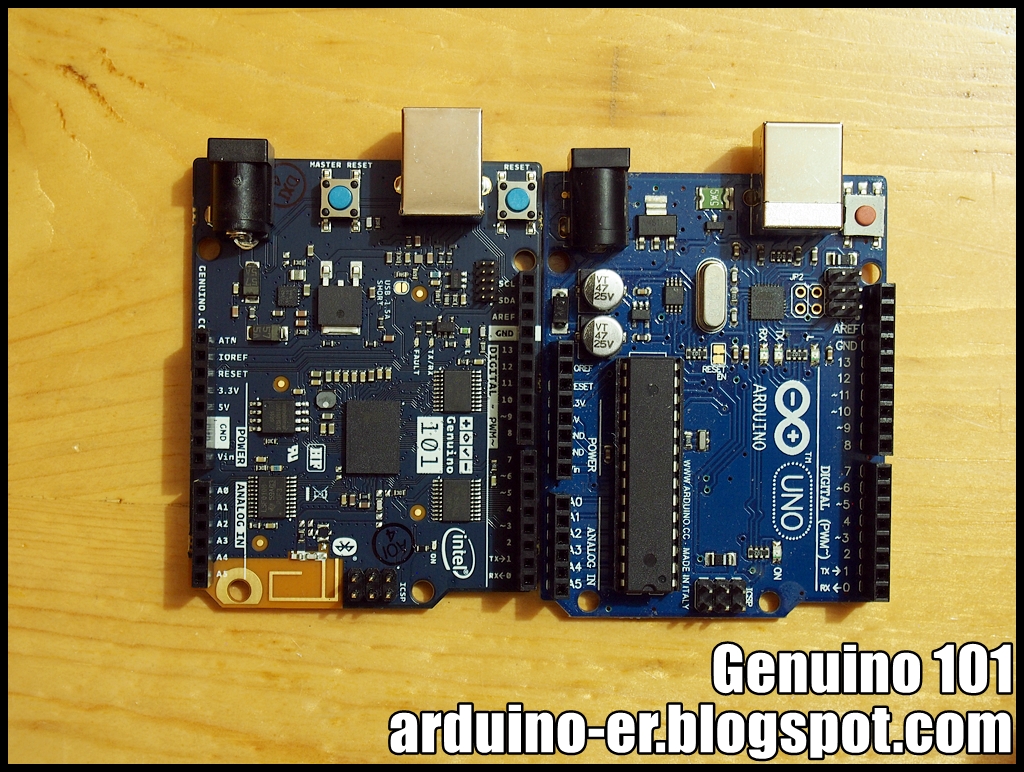
The Genuino 101 board have the same size of Arduino UNO, and fit the case for UNO, except the MASTER RESET button cannot be accessed if the top cover closed.
Fritzing part of Arduino/Genuino 101 can be download HERE.