Thursday, May 28, 2015

Arduino Due + ESP8266 web server controlled LED

It's a web server using Arduino Due + ESP8266 WiFi module, act as web server to turn ON/OFF Arduino Due on-board LED. It can be controlled by a Android App (in my another blog post: Arduino-er - Android App to control Arduino+ESP8266 web connected LED).


The ESP8266 set in CWMODE=2, its IP should be 192.168.4.1 by default.

Note: It have problem if client side sent command too fast, in connection close and connect too close.

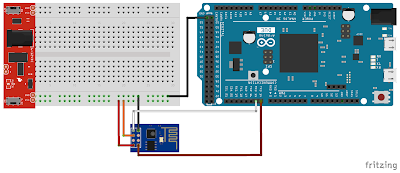
Connection:


Due8266WebControlLed_AP.ino
/*
Arduino Due - ESP 8266 WiFi Module

Act as AP mode, CWMODE=2

Serial (Tx/Rx) communicate to PC via USB
Serial3 (Tx3/Rx3) connect to ESP8266
Tx3 - ESP8266 Rx
Rx3 - ESP8266 Tx
ESP8266 CH_PD Connect to ESP8266 VCC

for firmware:
"v0.9.5.2 AT Firmware"
(http://goo.gl/oRdG3s)
AT version:0.21.0.0
SDK version:0.9.5

*/

#define ESP8266 Serial3

int LED = 13;

boolean FAIL_8266 = false;

#define BUFFER_SIZE 128
char buffer[BUFFER_SIZE];

void setup() {
  pinMode(LED, OUTPUT);
  
  digitalWrite(LED, LOW);
  delay(300);
  digitalWrite(LED, HIGH);
  delay(200);
  digitalWrite(LED, LOW);
  delay(300);
  digitalWrite(LED, HIGH);
  delay(200);
  digitalWrite(LED, LOW);
  delay(300);
  digitalWrite(LED, HIGH);
  delay(200);
  digitalWrite(LED, LOW);

  do{
    Serial.begin(115200);
    ESP8266.begin(115200);
  
    //Wait Serial Monitor to start
    while(!Serial);
    Serial.println("--- Start ---");

    ESP8266.println("AT+RST");
    delay(1000);
    if(ESP8266.find("ready"))
    {
      Serial.println("Module is ready");
      ESP8266.println("AT+CWMODE=2");
      delay(1000);
      clearESP8266SerialBuffer();

      //Get and display my IP
      sendESP8266Cmdln("AT+CIFSR", 1000);  
      //Set multi connections
      sendESP8266Cmdln("AT+CIPMUX=1", 1000);
      //Setup web server on port 80
      sendESP8266Cmdln("AT+CIPSERVER=1,80",1000);
        
      Serial.println("Server setup finish");
        
      FAIL_8266 = false;
    }else{
      Serial.println("Module have no response.");
      delay(500);
      FAIL_8266 = true;
    }
  }while(FAIL_8266);
  
  digitalWrite(LED, HIGH);
  ESP8266.setTimeout(1000);
}

void loop(){

  if(ESP8266.available()) // check if the esp is sending a message 
  {
    Serial.println("Something received");
    delay(1000);
    if(ESP8266.find("+IPD,"))
    {
      String action;
      
      Serial.println("+IPD, found");
      int connectionId = ESP8266.read()-48;
      Serial.println("connectionId: " + String(connectionId));
      
      ESP8266.find("led=");
      char s = ESP8266.read();
      if(s=='0'){
        action = "led=0";
        digitalWrite(LED, LOW);
      }else if(s=='1'){
        action = "led=1";
        digitalWrite(LED, HIGH);
      }else{
        action = "led=?";
      }
      
      Serial.println(action);
      sendHTTPResponse(connectionId, action);
      
      //Close TCP/UDP
      //String cmdCIPCLOSE = "AT+CIPCLOSE="; 
      //cmdCIPCLOSE += connectionId;
      //sendESP8266Cmdln(cmdCIPCLOSE, 1000);
    }
  }
  
}

void sendHTTPResponse(int id, String content)
{
  String response;
  response = "HTTP/1.1 200 OK\r\n";
  response += "Content-Type: text/html; charset=UTF-8\r\n"; 
  response += "Content-Length: ";
  response += content.length();
  response += "\r\n";
  response +="Connection: close\r\n\r\n";
  response += content;

  String cmd = "AT+CIPSEND=";
  cmd += id;
  cmd += ",";
  cmd += response.length();
  
  Serial.println("--- AT+CIPSEND ---");
  sendESP8266Cmdln(cmd, 1000);
  
  Serial.println("--- data ---");
  sendESP8266Data(response, 1000);
}

boolean waitOKfromESP8266(int timeout)
{
  do{
    Serial.println("wait OK...");
    delay(1000);
    if(ESP8266.find("OK"))
    {
      return true;
    }

  }while((timeout--)>0);
  return false;
}

//Send command to ESP8266, assume OK, no error check
//wait some time and display respond
void sendESP8266Cmdln(String cmd, int waitTime)
{
  ESP8266.println(cmd);
  delay(waitTime);
  clearESP8266SerialBuffer();
}

//Basically same as sendESP8266Cmdln()
//But call ESP8266.print() instead of call ESP8266.println()
void sendESP8266Data(String data, int waitTime)
{
  ESP8266.print(data);
  delay(waitTime);
  clearESP8266SerialBuffer();
}

//Clear and display Serial Buffer for ESP8266
void clearESP8266SerialBuffer()
{
  Serial.println("= clearESP8266SerialBuffer() =");
  while (ESP8266.available() > 0) {
    char a = ESP8266.read();
    Serial.write(a);
  }
  Serial.println("==============================");
}


Related:
Standalone ESP8266/ESP-12 (without controller/Arduino): web control on-board LED
Wednesday, May 27, 2015

Arduino Due + ESP8266 + DHT11, to update ThingSpeak

Here is a example to use Arduino Due read sensed data, humidity and temperature, from DHT11, send to ThingSpeak.com using WiFi module DSP8266.


ThingSpeak is an application platform for the Internet of Things (IoT). ThingSpeak allows you to build an application around data collected by sensors. Features of ThingSpeak include: real-time data collection, data processing, visualizations, apps, and plugins.

Before start,you have to sign-up ThingSpeak, visit: https://thingspeak.com/ to register, creat channel, get API Key. You can also try it using web browser.


Connection, refer to last post of "Arduino Due + ESP8266 + DHT11, to update dweet.io".

Arduino code, Due8266Client_ThingSpeak.ino
/*
Arduino Due + ESP 8266 WiFi Module
- As STA to Join AP
- Connect to thingspeak.com as client, 
  to update my thing of Humidity and Temperature
  (read from DHT11)

Serial (Tx/Rx) communicate to PC via USB
Serial3 (Tx3/Rx3) connect to ESP8266
Tx3 - ESP8266 Rx
Rx3 - ESP8266 Tx
ESP8266 CH_PD Connect to ESP8266 VCC

DHT11 connect to pin 2 of Arduino Due

for firmware:
"v0.9.5.2 AT Firmware"
(http://goo.gl/oRdG3s)
AT version:0.21.0.0
SDK version:0.9.5

*/
#define ESP8266 Serial3
#include "DHT.h"
#define DHTTYPE DHT11
#define DHTPIN 2  //pin 2 connect to DHT11
DHT dht(DHTPIN, DHTTYPE, 30);  //30 for Arduino Due

String SSID = "TestAP";
String PASSWORD = "12345678";

int LED = 13;

boolean FAIL_8266 = false;

#define BUFFER_SIZE 1024
char buffer[BUFFER_SIZE];

void setup() {
  pinMode(LED, OUTPUT);
  
  digitalWrite(LED, LOW);
  delay(300);
  digitalWrite(LED, HIGH);
  delay(200);
  digitalWrite(LED, LOW);
  delay(300);
  digitalWrite(LED, HIGH);
  delay(200);
  digitalWrite(LED, LOW);

  do{
    //Serial.begin(9600);
    //ESP8266.begin(9600);
    Serial.begin(115200);
    ESP8266.begin(115200);
  
    //Wait Serial Monitor to start
    while(!Serial);
    Serial.println("--- Start ---");

    ESP8266.println("AT+RST");
    delay(1000);
    if(ESP8266.find("ready"))
    {
      Serial.println("Module is ready");
      
      ESP8266.println("AT+GMR");
      delay(1000);
      clearESP8266SerialBuffer();
      
      ESP8266.println("AT+CWMODE=1");
      //ESP8266.println("AT+CWMODE=3");
      delay(2000);
      
      //Quit existing AP, for demo
      Serial.println("Quit AP");
      ESP8266.println("AT+CWQAP");
      delay(1000);
      
      clearESP8266SerialBuffer();
      if(cwJoinAP())
      {
        Serial.println("CWJAP Success");
        FAIL_8266 = false;
        
        delay(3000);
        clearESP8266SerialBuffer();
        //Get and display my IP
        sendESP8266Cmdln("AT+CIFSR", 1000);  
        //Set multi connections
        sendESP8266Cmdln("AT+CIPMUX=1", 1000);
        //sendESP8266Cmdln("AT+CIPMUX=0", 1000);

        Serial.println("Setup finish");
      }else{
        Serial.println("CWJAP Fail");
        delay(500);
        FAIL_8266 = true;
      }
    }else{
      Serial.println("Module have no response.");
      delay(500);
      FAIL_8266 = true;
    }
  }while(FAIL_8266);
  
  digitalWrite(LED, HIGH);
  
  //set timeout duration ESP8266.readBytesUntil
  ESP8266.setTimeout(1000);
  
  dht.begin();
}

void loop(){
  
  float valHumidity;
  float valTemperature;
  do{
    valHumidity = dht.readHumidity();
    valTemperature = dht.readTemperature();
  }while(isnan(valHumidity) || isnan(valTemperature));
  
  Serial.println("Humidity=" + String(valHumidity));
  Serial.println("Temperature=" + String(valTemperature));
  
  /*
  AT+CIPSTART=id,"type","addr",port
  id = 0
  type = "TCP"
  addr = "www.example.com"
  port = 80
  */
  String TARGET_ID="0";
  String TARGET_TYPE="TCP";
  String TARGET_ADDR="184.106.153.149";  //ThingSpeak IP Address
  String TARGET_PORT="80";

  String cmd="AT+CIPSTART=" + TARGET_ID;
  cmd += ",\"" + TARGET_TYPE + "\",\"" + TARGET_ADDR + "\"";
  cmd += ","+ TARGET_PORT;

  Serial.println(cmd);
  ESP8266.println(cmd);
  delay(1000);
  //Assume OK
  //display and clear buffer
  clearESP8266SerialBuffer();
  
  /*
  POST /update?key=<API KEY>&field1=xx.xx&field2=xx.xx HTTP/1.1\r\n
  Host: api.thingspeak.com\r\n\r\n
  */
  
  String ThingSpeakMethod = "POST";  //GET should also work
  String ThingSpeakHost = "/update";
  String ThingSpeakApiKey = "42WKM35W3FR0OJUG";
  String ThingSpeakField1 = "field1";
  String ThingSpeakField2 = "field2";
  String ThingSpeakHttp = "HTTP/1.1";
  
  String ThingSpeak_2ndLine = "Host: api.thingspeak.com\r\n\r\n";
  
  String HTTP_RQS = ThingSpeakMethod;
  HTTP_RQS += " " + ThingSpeakHost;
  HTTP_RQS += "?key=" + ThingSpeakApiKey;
  HTTP_RQS += "&" + ThingSpeakField1 + "=" + valHumidity;
  HTTP_RQS += "&" + ThingSpeakField2 + "=" + valTemperature;
  HTTP_RQS += " " + ThingSpeakHttp + "\r\n";
  HTTP_RQS += ThingSpeak_2ndLine;
  
  String cmdSEND_length = "AT+CIPSEND=";
  cmdSEND_length += TARGET_ID + "," + HTTP_RQS.length() +"\r\n";
  
  ESP8266.print(cmdSEND_length);
  Serial.println(cmdSEND_length);
  
  Serial.println("waiting >");
  
  if(!ESP8266.available());
  
  if(ESP8266.find(">")){
    Serial.println("> received");
    ESP8266.println(HTTP_RQS);
    Serial.println(HTTP_RQS);
    
    boolean OK_FOUND = false;
    
    //program blocked untill "SEND OK" return
    while(!OK_FOUND){
      if(ESP8266.readBytesUntil('\n', buffer, BUFFER_SIZE)>0){
        Serial.println("...");
        Serial.println(buffer);
        
        if(strncmp(buffer, "SEND OK", 7)==0){
          OK_FOUND = true;
          Serial.println("SEND OK found");
        }else{
          Serial.println("Not SEND OK...");
        }
      }
    }

    if(OK_FOUND){
      delay(1000);
      //Dummy display received data
      while (ESP8266.available() > 0) {
        char a = ESP8266.read();
        Serial.write(a);
      }
    }
    
  }else{
    Serial.println("> NOT received, something wrong!");
  }
  
  //Close connection
  String cmdCIPCLOSE = "AT+CIPCLOSE=" + TARGET_ID; 
  ESP8266.println(cmdCIPCLOSE);
  Serial.println(cmdCIPCLOSE);
  
  delay(5000);
  
}

boolean waitOKfromESP8266(int timeout)
{
  do{
    Serial.println("wait OK...");
    delay(1000);
    if(ESP8266.find("OK"))
    {
      return true;
    }

  }while((timeout--)>0);
  return false;
}

boolean cwJoinAP()
{
  String cmd="AT+CWJAP=\"" + SSID + "\",\"" + PASSWORD + "\"";
  ESP8266.println(cmd);
  return waitOKfromESP8266(10);
}

//Send command to ESP8266, assume OK, no error check
//wait some time and display respond
void sendESP8266Cmdln(String cmd, int waitTime)
{
  ESP8266.println(cmd);
  delay(waitTime);
  clearESP8266SerialBuffer();
}

//Basically same as sendESP8266Cmdln()
//But call ESP8266.print() instead of call ESP8266.println()
void sendESP8266Data(String data, int waitTime)
{
  //ESP8266.print(data);
  ESP8266.print(data);
  delay(waitTime);
  clearESP8266SerialBuffer();
}

//Clear and display Serial Buffer for ESP8266
void clearESP8266SerialBuffer()
{
  Serial.println("= clearESP8266SerialBuffer() =");
  while (ESP8266.available() > 0) {
    char a = ESP8266.read();
    Serial.write(a);
  }
  Serial.println("==============================");
}


Monday, May 25, 2015

Arduino Due + ESP8266 + DHT11, to update dweet.io

This example combine the posts of "Arduino Due + ESP8266 as client, connect to website", "Temperature & Humidity monitor using Arduino NANO + DHT11 + 0.96 inch 128X64 I2C OLED" and "IoT experience: Arduino Uno + Ethernet Shield send data to dweet.io and freeboard.io": to read Humidity and Temperature from DHT11, and update my thing at dweet.io using ESP8266.


equivalent connection:


Due8266Client_Dweet.ino
/*
Arduino Due + ESP 8266 WiFi Module
- As STA to Join AP
- Connect to dweet.io as client, 
  to update my thing of Humidity and Temperature
  (read from DHT11)

Serial (Tx/Rx) communicate to PC via USB
Serial3 (Tx3/Rx3) connect to ESP8266
Tx3 - ESP8266 Rx
Rx3 - ESP8266 Tx
ESP8266 CH_PD Connect to ESP8266 VCC

DHT11 connect to pin 2 of Arduino Due

for firmware:
"v0.9.5.2 AT Firmware"
(http://goo.gl/oRdG3s)
AT version:0.21.0.0
SDK version:0.9.5

*/
#define ESP8266 Serial3
#include "DHT.h"
#define DHTTYPE DHT11
#define DHTPIN 2  //pin 2 connect to DHT11
DHT dht(DHTPIN, DHTTYPE, 30);  //30 for Arduino Due

String SSID = "TestAP";
String PASSWORD = "12345678";

int LED = 13;

boolean FAIL_8266 = false;

#define BUFFER_SIZE 1024
char buffer[BUFFER_SIZE];

void setup() {
  pinMode(LED, OUTPUT);
  
  digitalWrite(LED, LOW);
  delay(300);
  digitalWrite(LED, HIGH);
  delay(200);
  digitalWrite(LED, LOW);
  delay(300);
  digitalWrite(LED, HIGH);
  delay(200);
  digitalWrite(LED, LOW);

  do{
    //Serial.begin(9600);
    //ESP8266.begin(9600);
    Serial.begin(115200);
    ESP8266.begin(115200);
  
    //Wait Serial Monitor to start
    while(!Serial);
    Serial.println("--- Start ---");

    ESP8266.println("AT+RST");
    delay(1000);
    if(ESP8266.find("ready"))
    {
      Serial.println("Module is ready");
      
      ESP8266.println("AT+GMR");
      delay(1000);
      clearESP8266SerialBuffer();
      
      ESP8266.println("AT+CWMODE=1");
      //ESP8266.println("AT+CWMODE=3");
      delay(2000);
      
      //Quit existing AP, for demo
      Serial.println("Quit AP");
      ESP8266.println("AT+CWQAP");
      delay(1000);
      
      clearESP8266SerialBuffer();
      if(cwJoinAP())
      {
        Serial.println("CWJAP Success");
        FAIL_8266 = false;
        
        delay(3000);
        clearESP8266SerialBuffer();
        //Get and display my IP
        sendESP8266Cmdln("AT+CIFSR", 1000);  
        //Set multi connections
        sendESP8266Cmdln("AT+CIPMUX=1", 1000);
        //sendESP8266Cmdln("AT+CIPMUX=0", 1000);

        Serial.println("Setup finish");
      }else{
        Serial.println("CWJAP Fail");
        delay(500);
        FAIL_8266 = true;
      }
    }else{
      Serial.println("Module have no response.");
      delay(500);
      FAIL_8266 = true;
    }
  }while(FAIL_8266);
  
  digitalWrite(LED, HIGH);
  
  //set timeout duration ESP8266.readBytesUntil
  ESP8266.setTimeout(1000);
  
  dht.begin();
}

void loop(){
  
  float valHumidity;
  float valTemperature;
  do{
    valHumidity = dht.readHumidity();
    valTemperature = dht.readTemperature();
  }while(isnan(valHumidity) || isnan(valTemperature));
  
  Serial.println("Humidity=" + String(valHumidity));
  Serial.println("Temperature=" + String(valTemperature));
  
  /*
  AT+CIPSTART=id,"type","addr",port
  id = 0
  type = "TCP"
  addr = "www.example.com"
  port = 80
  */
  String TARGET_ID="0";
  String TARGET_TYPE="TCP";
  String TARGET_ADDR="www.dweet.io";
  String TARGET_PORT="80";

  String cmd="AT+CIPSTART=" + TARGET_ID;
  cmd += ",\"" + TARGET_TYPE + "\",\"" + TARGET_ADDR + "\"";
  cmd += ","+ TARGET_PORT;

  Serial.println(cmd);
  ESP8266.println(cmd);
  delay(1000);
  //Assume OK
  //display and clear buffer
  clearESP8266SerialBuffer();
  
  /*
  GET /dweet/for/arduino-er?Humidity=xx.xx&Temperature=xx.xx HTTP/1.1\r\n
  Host: dweet.io:80\r\n\r\n
  */
  
  String DweetMethod = "GET";
  String DweetHost = "/dweet/for/";
  String DweetThingName = "arduino-er";
  String DweetKeyHumidity = "Humidity";
  String DweetKeyTemperature = "Temperature";
  String DweetVal1 = "world";
  String DweetHttp = "HTTP/1.1";
  
  String Dweet_2ndLine = "Host: dweet.io:80\r\n\r\n";
  
  String HTTP_RQS = DweetMethod;
  HTTP_RQS += " " + DweetHost + DweetThingName; 
  HTTP_RQS += "?" + DweetKeyHumidity + "=" + valHumidity;
  HTTP_RQS += "&" + DweetKeyTemperature + "=" + valTemperature;
  HTTP_RQS += " " + DweetHttp + "\r\n";
  HTTP_RQS += Dweet_2ndLine;
  
  String cmdSEND_length = "AT+CIPSEND=";
  cmdSEND_length += TARGET_ID + "," + HTTP_RQS.length() +"\r\n";
  
  ESP8266.print(cmdSEND_length);
  Serial.println(cmdSEND_length);
  
  Serial.println("waiting >");
  
  if(!ESP8266.available());
  
  if(ESP8266.find(">")){
    Serial.println("> received");
    ESP8266.println(HTTP_RQS);
    Serial.println(HTTP_RQS);
    
    boolean OK_FOUND = false;
    
    //program blocked untill "SEND OK" return
    while(!OK_FOUND){
      if(ESP8266.readBytesUntil('\n', buffer, BUFFER_SIZE)>0){
        Serial.println("...");
        Serial.println(buffer);
        
        if(strncmp(buffer, "SEND OK", 7)==0){
          OK_FOUND = true;
          Serial.println("SEND OK found");
        }else{
          Serial.println("Not SEND OK...");
        }
      }
    }

    if(OK_FOUND){
      delay(1000);
      //Dummy display received data
      while (ESP8266.available() > 0) {
        char a = ESP8266.read();
        Serial.write(a);
      }
    }
    
  }else{
    Serial.println("> NOT received, something wrong!");
  }
  
  //Close connection
  String cmdCIPCLOSE = "AT+CIPCLOSE=" + TARGET_ID; 
  ESP8266.println(cmdCIPCLOSE);
  Serial.println(cmdCIPCLOSE);
  
  delay(5000);
  
}

boolean waitOKfromESP8266(int timeout)
{
  do{
    Serial.println("wait OK...");
    delay(1000);
    if(ESP8266.find("OK"))
    {
      return true;
    }

  }while((timeout--)>0);
  return false;
}

boolean cwJoinAP()
{
  String cmd="AT+CWJAP=\"" + SSID + "\",\"" + PASSWORD + "\"";
  ESP8266.println(cmd);
  return waitOKfromESP8266(10);
}

//Send command to ESP8266, assume OK, no error check
//wait some time and display respond
void sendESP8266Cmdln(String cmd, int waitTime)
{
  ESP8266.println(cmd);
  delay(waitTime);
  clearESP8266SerialBuffer();
}

//Basically same as sendESP8266Cmdln()
//But call ESP8266.print() instead of call ESP8266.println()
void sendESP8266Data(String data, int waitTime)
{
  //ESP8266.print(data);
  ESP8266.print(data);
  delay(waitTime);
  clearESP8266SerialBuffer();
}

//Clear and display Serial Buffer for ESP8266
void clearESP8266SerialBuffer()
{
  Serial.println("= clearESP8266SerialBuffer() =");
  while (ESP8266.available() > 0) {
    char a = ESP8266.read();
    Serial.write(a);
  }
  Serial.println("==============================");
}


Related:
- Arduino Due + ESP8266 + DHT11, to update ThingSpeak

Saturday, May 23, 2015

Fit ESP-12 Breakout Board on breadboard

I have a ESP8266 ESP-12 WiFi Module (Full I/O) Breakout Board. But the board cover whole the width of breadboard, such that cannot insert breadboard wire. Alternatively, I have some pre-cut wires for breadboard, can be inserted under the breakout board to make it fit on breadboard.

I also add a breadboard power supply (3.3V selectable), a FTDI adapter and button for flashing firmware. And wires to lead out the GPIO16, 14, 12 and 13 for future use.


Here is the wires placement:


Friday, May 22, 2015

Arduino Due + ESP8266 as client, connect to Python SimpleHTTPServer

Last post show the program of "Arduino Due + ESP8266 as client, connect to website". We can also host our simple web server using python SimpleHTTPServer.

- It's assumed you have Python installed.
- Create a simple "index.html".
- Start the python SimpleHTTPServer with command:
$ python -m SimpleHTTPServer

Now you can visit http://<ip address>:8000 using browser, in the same network.

SimpleHTTPServer will check for file named index.html or index.htm in current directory. If found, the file’s contents are returned; otherwise a directory listing are returned.

Then you can update the Arduino code in last post "Arduino Due + ESP8266 as client, connect to website" to load the index.html.


Arduino Due + ESP8266 as client, connect to website

This exercise show how to program Arduino Due + ESP8266 as client, connect to website.

data loaded from "www.example.com"

www.example.com displayed at normal browser

Connection between Arduino Due and ESP8266, make sure both Due and ESP8266 are worked on 3.3V.


The ESP8266 is flashed with firmware "v0.9.5.2 AT Firmware.bin".

Due8266Client.ino
/*
Arduino Due + ESP 8266 WiFi Module
- As STA to Join AP
- Connect to website as client

Serial (Tx/Rx) communicate to PC via USB
Serial3 (Tx3/Rx3) connect to ESP8266
Tx3 - ESP8266 Rx
Rx3 - ESP8266 Tx
ESP8266 CH_PD Connect to ESP8266 VCC

for firmware:
"v0.9.5.2 AT Firmware"
(http://goo.gl/oRdG3s)
AT version:0.21.0.0
SDK version:0.9.5

*/
#define ESP8266 Serial3
String SSID = "TestAP";
String PASSWORD = "12345678";

int LED = 13;

boolean FAIL_8266 = false;

#define BUFFER_SIZE 1024
char buffer[BUFFER_SIZE];

void setup() {
  pinMode(LED, OUTPUT);
  
  digitalWrite(LED, LOW);
  delay(300);
  digitalWrite(LED, HIGH);
  delay(200);
  digitalWrite(LED, LOW);
  delay(300);
  digitalWrite(LED, HIGH);
  delay(200);
  digitalWrite(LED, LOW);

  do{
    //Serial.begin(9600);
    //ESP8266.begin(9600);
    Serial.begin(115200);
    ESP8266.begin(115200);
  
    //Wait Serial Monitor to start
    while(!Serial);
    Serial.println("--- Start ---");

    ESP8266.println("AT+RST");
    delay(1000);
    if(ESP8266.find("ready"))
    {
      Serial.println("Module is ready");
      
      ESP8266.println("AT+GMR");
      delay(1000);
      clearESP8266SerialBuffer();
      
      ESP8266.println("AT+CWMODE=1");
      //ESP8266.println("AT+CWMODE=3");
      delay(2000);
      
      //Quit existing AP, for demo
      Serial.println("Quit AP");
      ESP8266.println("AT+CWQAP");
      delay(1000);
      
      clearESP8266SerialBuffer();
      if(cwJoinAP())
      {
        Serial.println("CWJAP Success");
        FAIL_8266 = false;
        
        delay(3000);
        clearESP8266SerialBuffer();
        //Get and display my IP
        sendESP8266Cmdln("AT+CIFSR", 1000);  
        //Set multi connections
        sendESP8266Cmdln("AT+CIPMUX=1", 1000);
        //sendESP8266Cmdln("AT+CIPMUX=0", 1000);

        Serial.println("Setup finish");
      }else{
        Serial.println("CWJAP Fail");
        delay(500);
        FAIL_8266 = true;
      }
    }else{
      Serial.println("Module have no response.");
      delay(500);
      FAIL_8266 = true;
    }
  }while(FAIL_8266);
  
  digitalWrite(LED, HIGH);
  
  //set timeout duration ESP8266.readBytesUntil
  ESP8266.setTimeout(1000);
}

void loop(){
  /*
  AT+CIPSTART=id,"type","addr",port
  id = 0
  type = "TCP"
  addr = "www.example.com"
  port = 80
  */
  String TARGET_ID="0";
  String TARGET_TYPE="TCP";
  String TARGET_ADDR="www.example.com";
  String TARGET_PORT="80";
  //String TARGET_ADDR="www.google.com";
  //String TARGET_PORT="80";

  String cmd="AT+CIPSTART=" + TARGET_ID;
  cmd += ",\"" + TARGET_TYPE + "\",\"" + TARGET_ADDR + "\"";
  cmd += ","+ TARGET_PORT;

  Serial.println(cmd);
  ESP8266.println(cmd);
  delay(1000);
  //Assume OK
  //display and clear buffer
  clearESP8266SerialBuffer();
  
  /*
  GET / HTTP/1.1\r\n
  Host: www.example.com:80\r\n\r\n
  */
  String HTTP_RQS = "GET / HTTP/1.1\r\n";
  HTTP_RQS += "Host: " + TARGET_ADDR;
  HTTP_RQS += ":" + TARGET_PORT + "\r\n\r\n";
  
  String cmdSEND_length = "AT+CIPSEND=";
  cmdSEND_length += TARGET_ID + "," + HTTP_RQS.length() +"\r\n";
  
  ESP8266.print(cmdSEND_length);
  Serial.println(cmdSEND_length);
  
  Serial.println("waiting >");
  
  if(!ESP8266.available());
  
  if(ESP8266.find(">")){
    Serial.println("> received");
    ESP8266.println(HTTP_RQS);
    Serial.println(HTTP_RQS);
    
    boolean OK_FOUND = false;
    
    //program blocked untill "SEND OK" return
    while(!OK_FOUND){
      if(ESP8266.readBytesUntil('\n', buffer, BUFFER_SIZE)>0){
        Serial.println("...");
        Serial.println(buffer);
        
        if(strncmp(buffer, "SEND OK", 7)==0){
          OK_FOUND = true;
          Serial.println("SEND OK found");
        }else{
          Serial.println("Not SEND OK...");
        }
      }
    }

    if(OK_FOUND){
      
      //Dummy display received data
      //until connection CLOSED, "</HTML>" or "</html>" received
      //only compare beginning of lines
      int i;    
      while((i=ESP8266.readBytesUntil('\n', buffer, BUFFER_SIZE-1))>=0){
        buffer[i] = '\0';  //insert terminator
        Serial.println(buffer);
        
        //have to match with TARGET_ID
        if(strncmp(buffer, "0,CLOSED", 7)==0){
          Serial.println("CLOSED");
          break;
        }
        if(strncmp(buffer, "</HTML>", 7)==0){
          Serial.println("</HTML> found");
          break;
        }
        if(strncmp(buffer, "</html>", 7)==0){
          Serial.println("</html> found");
          break;
        }
      }
    }
    
  }else{
    Serial.println("> NOT received, something wrong!");
  }
  
  //Close connection
  String cmdCIPCLOSE = "AT+CIPCLOSE=" + TARGET_ID; 
  ESP8266.println(cmdCIPCLOSE);
  Serial.println(cmdCIPCLOSE);
  
  delay(10000);
  
}

boolean waitOKfromESP8266(int timeout)
{
  do{
    Serial.println("wait OK...");
    delay(1000);
    if(ESP8266.find("OK"))
    {
      return true;
    }

  }while((timeout--)>0);
  return false;
}

boolean cwJoinAP()
{
  String cmd="AT+CWJAP=\"" + SSID + "\",\"" + PASSWORD + "\"";
  ESP8266.println(cmd);
  return waitOKfromESP8266(10);
}

//Send command to ESP8266, assume OK, no error check
//wait some time and display respond
void sendESP8266Cmdln(String cmd, int waitTime)
{
  ESP8266.println(cmd);
  delay(waitTime);
  clearESP8266SerialBuffer();
}

//Basically same as sendESP8266Cmdln()
//But call ESP8266.print() instead of call ESP8266.println()
void sendESP8266Data(String data, int waitTime)
{
  //ESP8266.print(data);
  ESP8266.print(data);
  delay(waitTime);
  clearESP8266SerialBuffer();
}

//Clear and display Serial Buffer for ESP8266
void clearESP8266SerialBuffer()
{
  Serial.println("= clearESP8266SerialBuffer() =");
  while (ESP8266.available() > 0) {
    char a = ESP8266.read();
    Serial.write(a);
  }
  Serial.println("==============================");
}


- We can also host our simple web server using python SimpleHTTPServer. To be reached by Arduino Due + ESP8266 web client. Read next "Arduino Due + ESP8266 as client, connect to Python SimpleHTTPServer".

Related:
- Arduino Due + ESP8266 + DHT11, to update dweet.io

Thursday, May 21, 2015

Saturday, May 16, 2015

The State of Arduino, by Massimo Banzi


Learn about the latest developments in Arduino open-source microcontroller from Massimo Banzi, co-founder of the Arduino Project.

Through a U.S. manufacturing partnership with Adafruit and the launch of a new global sister brand called Genuino, Arduino announced a couple of big moves that address the challenges that have emerged for the company over the past few months.


Arduino Founder Massimo Shares the future of Arduino.cc, including a manufacturing partnership with Adafruit, and the start of a new brand to protect manufacturers from litigation.

Read more: http://makezine.com/2015/05/16/arduino-adafruit-manufacturing-genuino/

Arduino + Adafruit BIG news

Massimo Banzi, CEO and co-founder of Arduino, announced at Maker Faire during the “State of Arduino” keynote that Adafruit is manufacturing Arduino’s for Arduino.cc in New York, New York, USA! ~ https://blog.adafruit.com/2015/05/16/big-news-adafruit-is-manufacturing-arduinos-for-arduino-cc-in-new-york-new-york-usa-arduino-teamarduinocc/


Friday, May 15, 2015

Temperature & Humidity monitor using Arduino NANO + DHT11 + 0.96 inch 128X64 I2C OLED

A simple Temperature & Humidity monitor using Arduino NANO + DHT11 + 0.96 inch 128X64 I2C OLED.

Reference:
- Hello World 0.96 inch 128X64 I2C OLED, on Arduino Uno, using u8glib library
Arduino Nano + DHT11, Temperature & Humidity sensors
- To convert the float returned by dht library to string (cahr array) for u8glib to display, function dtostrf() is used.
  • The dtostrf() function converts the double value passed in val into an ASCII representationthat will be stored under s. The caller is responsible for providing sufficient storage in s.
    Conversion is done in the format "[-]d.ddd". The minimum field width of the output string (including the '.' and the possible sign for negative values) is given in width, and prec determines the number of digits after the decimal sign. width is signed value, negative for left adjustment.
    The dtostrf() function returns the pointer to the converted string s.
- To display the degree sign (°C or °F) on the mini OLED using u8glib, use te string:
°C : "\260C"
°F : "\260F"


NANO_DHT11_I2C_OLED.ino
// Read DHT11 humidity/temperature sensors
// display on 0.96 inch 128X64 I2C OLED

#include "DHT.h"
#include "U8glib.h"
U8GLIB_SSD1306_128X64 u8g(U8G_I2C_OPT_NONE|U8G_I2C_OPT_DEV_0);

#define DHTPIN 2     // what pin we're connected to

// Uncomment whatever type you're using!
#define DHTTYPE DHT11   // DHT 11 
//#define DHTTYPE DHT22   // DHT 22  (AM2302)
//#define DHTTYPE DHT21   // DHT 21 (AM2301)

// Connect pin 1 (on the left) of the sensor to +5V
// NOTE: If using a board with 3.3V logic like an Arduino Due connect pin 1
// to 3.3V instead of 5V!
// Connect pin 2 of the sensor to whatever your DHTPIN is
// Connect pin 4 (on the right) of the sensor to GROUND
// Connect a 10K resistor from pin 2 (data) to pin 1 (power) of the sensor

// Initialize DHT sensor for normal 16mhz Arduino
//DHT dht(DHTPIN, DHTTYPE);
// NOTE: For working with a faster chip, like an Arduino Due or Teensy, you
// might need to increase the threshold for cycle counts considered a 1 or 0.
// You can do this by passing a 3rd parameter for this threshold.  It's a bit
// of fiddling to find the right value, but in general the faster the CPU the
// higher the value.  The default for a 16mhz AVR is a value of 6.  For an
// Arduino Due that runs at 84mhz a value of 30 works.
// Example to initialize DHT sensor for Arduino Due:
DHT dht(DHTPIN, DHTTYPE, 6);

char str[10];

void drawTest(void) {
  u8g.setFont(u8g_font_unifont);
  u8g.drawStr( 0, 20, "DHTxx test!");
}

void setup() {
  Serial.begin(9600); 
  Serial.println("DHTxx test!");
 
  dht.begin();
  u8g.firstPage();  
  do {
    drawTest();
  } while( u8g.nextPage() );
}

void loop() {
  // Wait a few seconds between measurements.
  delay(2000);

  // Reading temperature or humidity takes about 250 milliseconds!
  // Sensor readings may also be up to 2 seconds 'old' (its a very slow sensor)
  float h = dht.readHumidity();
  // Read temperature as Celsius
  float t = dht.readTemperature();
  // Read temperature as Fahrenheit
  float f = dht.readTemperature(true);
  
  // Check if any reads failed and exit early (to try again).
  if (isnan(h) || isnan(t) || isnan(f)) {
    Serial.println("Failed to read from DHT sensor!");
    return;
  }

  // Compute heat index
  // Must send in temp in Fahrenheit!
  float hi = dht.computeHeatIndex(f, h);

  Serial.print("Humidity: "); 
  Serial.print(h);
  Serial.print(" %\t");
  
  Serial.print("Temperature: "); 
  Serial.print(t);
  Serial.print(" *C ");
  Serial.print(f);
  Serial.print(" *F\t");
  
  Serial.print("Heat index: ");
  Serial.print(hi);
  Serial.println(" *F");
  
  // picture loop
  u8g.firstPage();  
  do {
    u8g.setFont(u8g_font_helvB08);
    
    u8g.drawStr( 0, 15, "Humidity:");
    u8g.drawStr( 80, 15, dtostrf(h, 5, 2, str));
    u8g.drawStr( 120, 15, "%");
    
    u8g.drawStr( 0, 30, "Temperature:");
    u8g.drawStr( 80, 30, dtostrf(t, 5, 2, str));
    u8g.drawStr( 120, 30, "\260C");
    
    u8g.drawStr( 80, 45, dtostrf(f, 5, 2, str));
    u8g.drawStr( 120, 45, "\260F");
    
    u8g.drawStr( 0, 60, "Heat index:");
    u8g.drawStr( 80, 60, dtostrf(hi, 5, 2, str));
    u8g.drawStr( 120, 60, "\260F");
    
  } while( u8g.nextPage() );
}


Related:
- Arduino Due + ESP8266 + DHT11, to update dweet.io


Monday, May 11, 2015

Arduino Nano + DHT11, Temperature & Humidity sensors

This example run on Arduino Nano, read DHT11 (Temperature & Humidity sensors), send data to PC via serial. The library adafruit/DHT-sensor-library is used to read DHT11.


The library adafruit/DHT-sensor-library is included in Arduino IDE library sources, so it's easy to add it to your project. Read the video to know how to add the library to Arduino IDE.


Once the library added, you can find a example in File -> Examples -> DHT sensor library -> DHTtester.


To make it work on Arduino Nano + DHT11, DHTtester.ino
// Example testing sketch for various DHT humidity/temperature sensors
// Written by ladyada, public domain

#include "DHT.h"

#define DHTPIN 2     // what pin we're connected to

// Uncomment whatever type you're using!
#define DHTTYPE DHT11   // DHT 11 
//#define DHTTYPE DHT22   // DHT 22  (AM2302)
//#define DHTTYPE DHT21   // DHT 21 (AM2301)

// Connect pin 1 (on the left) of the sensor to +5V
// NOTE: If using a board with 3.3V logic like an Arduino Due connect pin 1
// to 3.3V instead of 5V!
// Connect pin 2 of the sensor to whatever your DHTPIN is
// Connect pin 4 (on the right) of the sensor to GROUND
// Connect a 10K resistor from pin 2 (data) to pin 1 (power) of the sensor

// Initialize DHT sensor for normal 16mhz Arduino
//DHT dht(DHTPIN, DHTTYPE);
// NOTE: For working with a faster chip, like an Arduino Due or Teensy, you
// might need to increase the threshold for cycle counts considered a 1 or 0.
// You can do this by passing a 3rd parameter for this threshold.  It's a bit
// of fiddling to find the right value, but in general the faster the CPU the
// higher the value.  The default for a 16mhz AVR is a value of 6.  For an
// Arduino Due that runs at 84mhz a value of 30 works.
// Example to initialize DHT sensor for Arduino Due:
DHT dht(DHTPIN, DHTTYPE, 6);

void setup() {
  Serial.begin(9600); 
  Serial.println("DHTxx test!");
 
  dht.begin();
}

void loop() {
  // Wait a few seconds between measurements.
  delay(2000);

  // Reading temperature or humidity takes about 250 milliseconds!
  // Sensor readings may also be up to 2 seconds 'old' (its a very slow sensor)
  float h = dht.readHumidity();
  // Read temperature as Celsius
  float t = dht.readTemperature();
  // Read temperature as Fahrenheit
  float f = dht.readTemperature(true);
  
  // Check if any reads failed and exit early (to try again).
  if (isnan(h) || isnan(t) || isnan(f)) {
    Serial.println("Failed to read from DHT sensor!");
    return;
  }

  // Compute heat index
  // Must send in temp in Fahrenheit!
  float hi = dht.computeHeatIndex(f, h);

  Serial.print("Humidity: "); 
  Serial.print(h);
  Serial.print(" %\t");
  Serial.print("Temperature: "); 
  Serial.print(t);
  Serial.print(" *C ");
  Serial.print(f);
  Serial.print(" *F\t");
  Serial.print("Heat index: ");
  Serial.print(hi);
  Serial.println(" *F");
}

Thursday, May 7, 2015

Arduino + ESP8266 - Web Server (III) with firmware 00200.9.5(b1)

Refer to my last exercise "Arduino + ESP8266 - Web Server (II)", as shown in the video, the ESP8266 reset sometimes. It's due to the pre-load old firmware. By updateing the new version of 00200.9.5(b1), solve the problem of reset.

Here is a test on the new firmware 00200.9.5(b1):


Due8266Web.ino
/*
Arduino Due - ESP 8266 WiFi Module
Serial (Tx/Rx) communicate to PC via USB
Serial3 (Tx3/Rx3) connect to ESP8266
Tx3 - ESP8266 Rx
Rx3 - ESP8266 Tx
ESP8266 CH_PD Connect to ESP8266 VCC

for firmware:
00200.9.5(b1)
compiled @ Dec 25 2014 21:40:28
AI-THINKER Dec 25 2014

*/
#define ASCII_0 48
#define ESP8266 Serial3
String SSID = "TestAP";
String PASSWORD = "12345678";

int LED = 13;

boolean FAIL_8266 = false;

String strHTML1 = "<!doctype html>\
<html>\
<head>\
<title>arduino-er</title>\
</head>\
<body>\
<H1>arduino-er.blogspot.com</H1>";

String strHTML2 = "</body>\
</html>";

//String strHTML = "arduino-er.blogspot.com";

#define BUFFER_SIZE 128
char buffer[BUFFER_SIZE];

void setup() {
  pinMode(LED, OUTPUT);
  
  digitalWrite(LED, LOW);
  delay(300);
  digitalWrite(LED, HIGH);
  delay(200);
  digitalWrite(LED, LOW);
  delay(300);
  digitalWrite(LED, HIGH);
  delay(200);
  digitalWrite(LED, LOW);

  do{
    Serial.begin(9600);
    ESP8266.begin(9600);
  
    //Wait Serial Monitor to start
    while(!Serial);
    Serial.println("--- Start ---");

    ESP8266.println("AT+RST");
    delay(1000);
    if(ESP8266.find("ready"))
    {
      Serial.println("Module is ready");
      
      ESP8266.println("AT+GMR");
      delay(1000);
      clearESP8266SerialBuffer();
      
      ESP8266.println("AT+CWMODE=1");
      delay(2000);
      
      //Quit existing AP, for demo
      Serial.println("Quit AP");
      ESP8266.println("AT+CWQAP");
      delay(1000);
      
      clearESP8266SerialBuffer();
      if(cwJoinAP())
      {
        Serial.println("CWJAP Success");
        FAIL_8266 = false;
        
        delay(3000);
        clearESP8266SerialBuffer();
        //Get and display my IP
        sendESP8266Cmdln("AT+CIFSR", 1000);  
        //Set multi connections
        sendESP8266Cmdln("AT+CIPMUX=1", 1000);
        //Setup web server on port 80
        sendESP8266Cmdln("AT+CIPSERVER=1,80",1000);
        
        Serial.println("Server setup finish");
      }else{
        Serial.println("CWJAP Fail");
        delay(500);
        FAIL_8266 = true;
      }
    }else{
      Serial.println("Module have no response.");
      delay(500);
      FAIL_8266 = true;
    }
  }while(FAIL_8266);
  
  digitalWrite(LED, HIGH);
  
  //set timeout duration ESP8266.readBytesUntil
  ESP8266.setTimeout(1000);
}

void loop(){
  int connectionId;
  
  if(ESP8266.readBytesUntil('\n', buffer, BUFFER_SIZE)>0)
  {
    Serial.println("Something received");
    Serial.println(buffer);
    if(strncmp(buffer, "+IPD,", 5)==0){
      Serial.println("+IPD, found");
      sscanf(buffer+5, "%d", &connectionId);
      Serial.println("connectionId: " + String(connectionId));
      delay(1000);
      clearESP8266SerialBuffer();
      
      sendHTTPResponse(connectionId, strHTML1);
      sendHTTPResponse(connectionId, "<hr/>-END-<br/>");
      sendHTTPResponse(connectionId, strHTML2);

      //Close TCP/UDP
      String cmdCIPCLOSE = "AT+CIPCLOSE="; 
      cmdCIPCLOSE += connectionId;
      sendESP8266Cmdln(cmdCIPCLOSE, 1000);
    }
  }
}

void sendHTTPResponse(int id, String response)
{
  String cmd = "AT+CIPSEND=";
  cmd += id;
  cmd += ",";
  cmd += response.length();
  
  Serial.println("--- AT+CIPSEND ---");
  sendESP8266Cmdln(cmd, 1000);
  
  Serial.println("--- data ---");
  sendESP8266Data(response, 1000);
}

boolean waitOKfromESP8266(int timeout)
{
  do{
    Serial.println("wait OK...");
    delay(1000);
    if(ESP8266.find("OK"))
    {
      return true;
    }

  }while((timeout--)>0);
  return false;
}

boolean cwJoinAP()
{
  String cmd="AT+CWJAP=\"" + SSID + "\",\"" + PASSWORD + "\"";
  ESP8266.println(cmd);
  return waitOKfromESP8266(10);
}

//Send command to ESP8266, assume OK, no error check
//wait some time and display respond
void sendESP8266Cmdln(String cmd, int waitTime)
{
  ESP8266.println(cmd);
  delay(waitTime);
  clearESP8266SerialBuffer();
}

//Basically same as sendESP8266Cmdln()
//But call ESP8266.print() instead of call ESP8266.println()
void sendESP8266Data(String data, int waitTime)
{
  //ESP8266.print(data);
  ESP8266.print(data);
  delay(waitTime);
  clearESP8266SerialBuffer();
}

//Clear and display Serial Buffer for ESP8266
void clearESP8266SerialBuffer()
{
  Serial.println("= clearESP8266SerialBuffer() =");
  while (ESP8266.available() > 0) {
    char a = ESP8266.read();
    Serial.write(a);
  }
  Serial.println("==============================");
}


~ Same code run on Arduino Mega 2560 + ESP-05.

Flash ESP8266 Firmware using esptool.py

Steps to download and flash firmware on ESP8266, using esptool.py, on Linux with Python 2.7.


- Download esptool, esptool.py.
- Download Firmware of ESP8266. I found it here: Ai-Thinker Firmware.
- Save the esptool.py and firmware in the same directory.

-Connect ESP8266 with FTDI adapter, make sure both ESP8266 and FTDI work on 3.3V.
ESP8266 VCC to separate 3.3V
ESP8266 GND - FTDI GND
ESP8266 TX - FTDI RX
ESP8266 RX - FTDI TX
ESP8266 CH_PD - ESP8266 3.3V
ESP8266 GPIO_0 - GND


- FTDI connect to PC USB.
- Power ON ESP8266.
- Run esptool:
$ python esptool.py -p /dev/ttyUSB0 write_flash 0x000000 "AI-v0.9.5.0 AT Firmware.bin"

where
- /dev/ttyUSB0 is the port to connect FTDI.
- AI-v0.9.5.0 AT Firmware.bin is the downloaded firmware.

The firmware I downloaded is:
00200.9.5(b1)
compiled @ Dec 25 2014 21:40:28
AI-THINKER Dec 25 2014


Usefull link:
- electrodragon.com ESP8266 Firmware

Newer version
Update ESP8266 firmware "v0.9.5.2 AT Firmware.bin"

Arduino 1.6.4 is available now

Arduino IDE 1.6.4 is available now, download HERE.


Tuesday, May 5, 2015

Arduino + ESP8266 - Web Server (II)


Last exercise "Arduino + ESP8266 - a simpe web server response with HTML" use a simple approach to find the "+IPD" in the income stream. But if fail to detect it, the buffer will not be updated, it will stop and need restart. It's another approach using readBytesUntil() to load the data to another buffer, and find "+IPD" programmatically using strncmp(). Such that if fail to detect "+IPD", it still can work for next connection.


In order to know the pattern of "+IPD" and the connection id in the incoming stream, I make a test program to show it in Serial Monitor, refer to the bottom of this post.

Due8266Web.ino
/*
Arduino Due - ESP 8266 WiFi Module
Serial (Tx/Rx) communicate to PC via USB
Serial3 (Tx3/Rx3) connect to ESP8266
Tx3 - ESP8266 Rx
Rx3 - ESP8266 Tx
ESP8266 CH_PD Connect to ESP8266 VCC
*/
#define ASCII_0 48
#define ESP8266 Serial3
String SSID = "TestAP";
String PASSWORD = "12345678";

int LED = 13;

boolean FAIL_8266 = false;

String strHTML = "<!doctype html>\
<html>\
<head>\
<title>arduino-er</title>\
</head>\
<body>\
<H1>arduino-er.blogspot.com</H1>\
</body>\
</html>";

#define BUFFER_SIZE 128
char buffer[BUFFER_SIZE];

void setup() {
  pinMode(LED, OUTPUT);
  
  digitalWrite(LED, LOW);
  delay(300);
  digitalWrite(LED, HIGH);
  delay(200);
  digitalWrite(LED, LOW);
  delay(300);
  digitalWrite(LED, HIGH);
  delay(200);
  digitalWrite(LED, LOW);
  delay(300);
  digitalWrite(LED, HIGH);
  delay(200);
  digitalWrite(LED, LOW);

  do{
    Serial.begin(9600);
    ESP8266.begin(9600);
  
    //Wait Serial Monitor to start
    while(!Serial);
    Serial.println("--- Start ---");

    ESP8266.println("AT+RST");
    delay(1000);
    if(ESP8266.find("ready"))
    {
      Serial.println("Module is ready");
      ESP8266.println("AT+CWMODE=1");
      delay(2000);
      
      //Quit existing AP, for demo
      Serial.println("Quit AP");
      ESP8266.println("AT+CWQAP");
      delay(1000);
      
      clearESP8266SerialBuffer();
      if(cwJoinAP())
      {
        Serial.println("CWJAP Success");
        FAIL_8266 = false;
        
        delay(3000);
        clearESP8266SerialBuffer();
        //Get and display my IP
        sendESP8266Cmdln("AT+CIFSR", 1000);  
        //Set multi connections
        sendESP8266Cmdln("AT+CIPMUX=1", 1000);
        //Setup web server on port 80
        sendESP8266Cmdln("AT+CIPSERVER=1,80",1000);
        
        Serial.println("Server setup finish");
      }else{
        Serial.println("CWJAP Fail");
        delay(500);
        FAIL_8266 = true;
      }
    }else{
      Serial.println("Module have no response.");
      delay(500);
      FAIL_8266 = true;
    }
  }while(FAIL_8266);
  
  digitalWrite(LED, HIGH);
}

void loop(){
  int connectionId;
  
  if(ESP8266.readBytesUntil('\n', buffer, BUFFER_SIZE)>0)
  {
    Serial.println("Something received");
    Serial.println(buffer);
    if(strncmp(buffer, "+IPD,", 5)==0){
      Serial.println("+IPD, found");
      sscanf(buffer+5, "%d", &connectionId);
      Serial.println("connectionId: " + String(connectionId));
      delay(1000);
      clearESP8266SerialBuffer();
      
      sendHTTPResponse(connectionId, strHTML);
      
      //Close TCP/UDP
      String cmdCIPCLOSE = "AT+CIPCLOSE="; 
      cmdCIPCLOSE += connectionId;
      sendESP8266Cmdln(cmdCIPCLOSE, 1000);
    }
  }
}

void sendHTTPResponse(int id, String content)
{
  String response;
  response = "HTTP/1.1 200 OK\r\n";
  response += "Content-Type: text/html; charset=UTF-8\r\n"; 
  response += "Content-Length: ";
  response += content.length();
  response += "\r\n";
  response +="Connection: close\r\n\r\n";
  response += content;

  String cmd = "AT+CIPSEND=";
  cmd += id;
  cmd += ",";
  cmd += response.length();
  
  Serial.println("--- AT+CIPSEND ---");
  sendESP8266Cmdln(cmd, 1000);
  
  Serial.println("--- data ---");
  sendESP8266Data(response, 1000);
}

boolean waitOKfromESP8266(int timeout)
{
  do{
    Serial.println("wait OK...");
    delay(1000);
    if(ESP8266.find("OK"))
    {
      return true;
    }

  }while((timeout--)>0);
  return false;
}

boolean cwJoinAP()
{
  String cmd="AT+CWJAP=\"" + SSID + "\",\"" + PASSWORD + "\"";
  ESP8266.println(cmd);
  return waitOKfromESP8266(10);
}

//Send command to ESP8266, assume OK, no error check
//wait some time and display respond
void sendESP8266Cmdln(String cmd, int waitTime)
{
  ESP8266.println(cmd);
  delay(waitTime);
  clearESP8266SerialBuffer();
}

//Basically same as sendESP8266Cmdln()
//But call ESP8266.print() instead of call ESP8266.println()
void sendESP8266Data(String data, int waitTime)
{
  ESP8266.print(data);
  delay(waitTime);
  clearESP8266SerialBuffer();
}

//Clear and display Serial Buffer for ESP8266
void clearESP8266SerialBuffer()
{
  Serial.println("= clearESP8266SerialBuffer() =");
  while (ESP8266.available() > 0) {
    char a = ESP8266.read();
    Serial.write(a);
  }
  Serial.println("==============================");
}


NOTICE:
In my test, sometimes the ESP8266 ESP-12 reset and show the vendor website. It's caused by the pre-load old firmware, to fix it, flash ESP8266 with new firmware. Refer to my next exercise with the updated firmware 00200.9.5(b1).


To know the "+IPD" and the connection id, I prepare this simple program to show the incoming data on Serial Monitor, without response back to the client.

testDue8266Web.ino
/*
Arduino Due - ESP 8266 WiFi Module
Serial (Tx/Rx) communicate to PC via USB
Serial3 (Tx3/Rx3) connect to ESP8266
Tx3 - ESP8266 Rx
Rx3 - ESP8266 Tx
ESP8266 CH_PD Connect to ESP8266 VCC
*/
#define ASCII_0 48
#define ESP8266 Serial3
//String SSID = "TestAP";
//String PASSWORD = "12345678";

int LED = 13;

boolean FAIL_8266 = false;

String strHTML = "<!doctype html>\
<html>\
<head>\
<title>arduino-er</title>\
</head>\
<body>\
<H1>arduino-er.blogspot.com</H1>\
</body>\
</html>";

void setup() {
  pinMode(LED, OUTPUT);
  
  digitalWrite(LED, LOW);
  delay(300);
  digitalWrite(LED, HIGH);
  delay(200);
  digitalWrite(LED, LOW);
  delay(300);
  digitalWrite(LED, HIGH);
  delay(200);
  digitalWrite(LED, LOW);
  delay(300);
  digitalWrite(LED, HIGH);
  delay(200);
  digitalWrite(LED, LOW);

  do{
    Serial.begin(9600);
    ESP8266.begin(9600);
  
    //Wait Serial Monitor to start
    while(!Serial);
    Serial.println("--- Start ---");

    ESP8266.println("AT+RST");
    delay(1000);
    if(ESP8266.find("ready"))
    {
      Serial.println("Module is ready");
      ESP8266.println("AT+CWMODE=2");
      delay(1000);
      
      clearESP8266SerialBuffer();
      sendESP8266Cmdln("AT+CIFSR", 1000);  
      //Set multi connections
      sendESP8266Cmdln("AT+CIPMUX=1", 1000);
      //Setup web server on port 80
      sendESP8266Cmdln("AT+CIPSERVER=1,80",1000);
      Serial.println("Server setup finish");
    }else{
      Serial.println("Module have no response.");
      delay(500);
      FAIL_8266 = true;
    }
  }while(FAIL_8266);
  
  digitalWrite(LED, HIGH);
}

void loop(){
  while (ESP8266.available() > 0) {
    char a = ESP8266.read();
    Serial.write(a);
  }
}

boolean waitOKfromESP8266(int timeout)
{
  do{
    Serial.println("wait OK...");
    delay(1000);
    if(ESP8266.find("OK"))
    {
      return true;
    }

  }while((timeout--)>0);
  return false;
}

//Send command to ESP8266, assume OK, no error check
//wait some time and display respond
void sendESP8266Cmdln(String cmd, int waitTime)
{
  ESP8266.println(cmd);
  delay(waitTime);
  clearESP8266SerialBuffer();
}

//Basically same as sendESP8266Cmdln()
//But call ESP8266.print() instead of call ESP8266.println()
void sendESP8266Data(String data, int waitTime)
{
  ESP8266.print(data);
  delay(waitTime);
  clearESP8266SerialBuffer();
}

//Clear and display Serial Buffer for ESP8266
void clearESP8266SerialBuffer()
{
  Serial.println("= clearESP8266SerialBuffer() =");
  while (ESP8266.available() > 0) {
    char a = ESP8266.read();
    Serial.write(a);
  }
  Serial.println("==============================");
}


Monday, May 4, 2015

Arduino + ESP8266 - a simpe web server response with HTML

Implement a web server with Arduino Due + ESP8266 ESP-12, response HTML page.


Connection:
ESP-12 VCC connect to separated power of 3.3V
Due GND - ESP-12 GND
Due TX3 - ESP-12 RX
Due RX3 - ESP-12 TX
ESP-12 CH_PD connect to ESP-12 VCC

Due connect with PC USB, such that we can monitor the status of ESP-12.

Start Serial Monitor, at 9600 baud, to reset and start run the program.

Due8266Web.ino
/*
Arduino Due - ESP 8266 WiFi Module
Serial (Tx/Rx) communicate to PC via USB
Serial3 (Tx3/Rx3) connect to ESP8266
Tx3 - ESP8266 Rx
Rx3 - ESP8266 Tx
ESP8266 CH_PD Connect to ESP8266 VCC
*/
#define ASCII_0 48
#define ESP8266 Serial3
String SSID = "TestAP";
String PASSWORD = "12345678";

int LED = 13;

boolean FAIL_8266 = false;

String strHTML = "<!doctype html>\
<html>\
<head>\
<title>arduino-er</title>\
</head>\
<body>\
<H1>arduino-er.blogspot.com</H1>\
</body>\
</html>";

void setup() {
  pinMode(LED, OUTPUT);
  
  digitalWrite(LED, LOW);
  delay(300);
  digitalWrite(LED, HIGH);
  delay(200);
  digitalWrite(LED, LOW);
  delay(300);
  digitalWrite(LED, HIGH);
  delay(200);
  digitalWrite(LED, LOW);
  delay(300);
  digitalWrite(LED, HIGH);
  delay(200);
  digitalWrite(LED, LOW);

  do{
    Serial.begin(9600);
    ESP8266.begin(9600);
  
    //Wait Serial Monitor to start
    while(!Serial);
    Serial.println("--- Start ---");

    ESP8266.println("AT+RST");
    delay(1000);
    if(ESP8266.find("ready"))
    {
      Serial.println("Module is ready");
      ESP8266.println("AT+CWMODE=1");
      delay(2000);
      
      //Quit existing AP, for demo
      Serial.println("Quit AP");
      ESP8266.println("AT+CWQAP");
      delay(1000);
      
      clearESP8266SerialBuffer();
      if(cwJoinAP())
      {
        Serial.println("CWJAP Success");
        FAIL_8266 = false;
        
        delay(3000);
        clearESP8266SerialBuffer();
        //Get and display my IP
        sendESP8266Cmdln("AT+CIFSR", 1000);  
        //Set multi connections
        sendESP8266Cmdln("AT+CIPMUX=1", 1000);
        //Setup web server on port 80
        sendESP8266Cmdln("AT+CIPSERVER=1,80",1000);
        
        Serial.println("Server setup finish");
      }else{
        Serial.println("CWJAP Fail");
        delay(500);
        FAIL_8266 = true;
      }
    }else{
      Serial.println("Module have no response.");
      delay(500);
      FAIL_8266 = true;
    }
  }while(FAIL_8266);
  
  digitalWrite(LED, HIGH);
}

void loop(){
  if(ESP8266.available())
  {
    Serial.println("Something received");
    delay(1000);
    if(ESP8266.find("+IPD,"))
    {
      String action;
      
      Serial.println("+IPD, found");
      int connectionId = ESP8266.read()-ASCII_0;
      Serial.println("connectionId: " + String(connectionId));
      
      sendHTTPResponse(connectionId, strHTML);
      
      //Close TCP/UDP
      String cmdCIPCLOSE = "AT+CIPCLOSE="; 
      cmdCIPCLOSE += connectionId;
      sendESP8266Cmdln(cmdCIPCLOSE, 1000);
    }
  }
}

void sendHTTPResponse(int id, String content)
{
  String response;
  response = "HTTP/1.1 200 OK\r\n";
  response += "Content-Type: text/html; charset=UTF-8\r\n"; 
  response += "Content-Length: ";
  response += content.length();
  response += "\r\n";
  response +="Connection: close\r\n\r\n";
  response += content;

  String cmd = "AT+CIPSEND=";
  cmd += id;
  cmd += ",";
  cmd += response.length();
  
  Serial.println("--- AT+CIPSEND ---");
  sendESP8266Cmdln(cmd, 1000);
  
  Serial.println("--- data ---");
  sendESP8266Data(response, 1000);
}

boolean waitOKfromESP8266(int timeout)
{
  do{
    Serial.println("wait OK...");
    delay(1000);
    if(ESP8266.find("OK"))
    {
      return true;
    }

  }while((timeout--)>0);
  return false;
}

boolean cwJoinAP()
{
  String cmd="AT+CWJAP=\"" + SSID + "\",\"" + PASSWORD + "\"";
  ESP8266.println(cmd);
  return waitOKfromESP8266(10);
}

//Send command to ESP8266, assume OK, no error check
//wait some time and display respond
void sendESP8266Cmdln(String cmd, int waitTime)
{
  ESP8266.println(cmd);
  delay(waitTime);
  clearESP8266SerialBuffer();
}

//Basically same as sendESP8266Cmdln()
//But call ESP8266.print() instead of call ESP8266.println()
void sendESP8266Data(String data, int waitTime)
{
  ESP8266.print(data);
  delay(waitTime);
  clearESP8266SerialBuffer();
}

//Clear and display Serial Buffer for ESP8266
void clearESP8266SerialBuffer()
{
  Serial.println("= clearESP8266SerialBuffer() =");
  while (ESP8266.available() > 0) {
    char a = ESP8266.read();
    Serial.write(a);
  }
  Serial.println("==============================");
}

Remark:
As shown in the video, it's sometimes unstable! Read the improved version in next post "Arduino + ESP8266 - Web Server (II)".

Sunday, May 3, 2015

Arduino Due + ESP8266: Web Control LED

This example show how to implement a simple web server on Arduino Due with ESP8266 ESP-12 WiFi Module. User visit it with GET method to turn ON/OFF the on-board LED of Arduino Due.


to turn ON LED:
http://ipaddress?led=1
to turn OFF LED:
http://ipaddress?led=0

This demo run with ESP-12, suppose it work on any ESP8266 module.


In fact, it's not too stable! Sometime will lost if cannot detect "+IPD".

Connection:
ESP-12 VCC connect to separated power of 3.3V
Due GND - ESP-12 GND
Due TX3 - ESP-12 RX
Due RX3 - ESP-12 TX
ESP-12 CH_PD connect to ESP-12 VCC

Due connect with PC USB, such that we can monitor the status of ESP-12.

Start Serial Monitor, at 9600 baud, to reset and start run the program.

Due8266WebControlLed.ino
/*
Arduino Due - ESP 8266 WiFi Module
Serial (Tx/Rx) communicate to PC via USB
Serial3 (Tx3/Rx3) connect to ESP8266
Tx3 - ESP8266 Rx
Rx3 - ESP8266 Tx
ESP8266 CH_PD Connect to ESP8266 VCC
*/

#define ESP8266 Serial3
String SSID = "TestAP";
String PASSWORD = "12345678";

int LED = 13;

boolean FAIL_8266 = false;

void setup() {
  pinMode(LED, OUTPUT);
  
  digitalWrite(LED, LOW);
  delay(300);
  digitalWrite(LED, HIGH);
  delay(200);
  digitalWrite(LED, LOW);
  delay(300);
  digitalWrite(LED, HIGH);
  delay(200);
  digitalWrite(LED, LOW);
  delay(300);
  digitalWrite(LED, HIGH);
  delay(200);
  digitalWrite(LED, LOW);

  do{
    Serial.begin(9600);
    ESP8266.begin(9600);
  
    //Wait Serial Monitor to start
    while(!Serial);
    Serial.println("--- Start ---");

    ESP8266.println("AT+RST");
    delay(1000);
    if(ESP8266.find("ready"))
    {
      Serial.println("Module is ready");
      ESP8266.println("AT+CWMODE=1");
      delay(2000);
      
      //Quit existing AP, for demo
      Serial.println("Quit AP");
      ESP8266.println("AT+CWQAP");
      delay(1000);
      
      clearESP8266SerialBuffer();
      if(cwJoinAP())
      {
        Serial.println("CWJAP Success");
        FAIL_8266 = false;
        
        delay(3000);
        clearESP8266SerialBuffer();
        //Get and display my IP
        sendESP8266Cmdln("AT+CIFSR", 1000);  
        //Set multi connections
        sendESP8266Cmdln("AT+CIPMUX=1", 1000);
        //Setup web server on port 80
        sendESP8266Cmdln("AT+CIPSERVER=1,80",1000);
        
        Serial.println("Server setup finish");
      }else{
        Serial.println("CWJAP Fail");
        delay(500);
        FAIL_8266 = true;
      }
    }else{
      Serial.println("Module have no response.");
      delay(500);
      FAIL_8266 = true;
    }
  }while(FAIL_8266);
  
  digitalWrite(LED, HIGH);
}

void loop(){
  if(ESP8266.available()) 
  {
    Serial.println("Something received");
    delay(1000);
    if(ESP8266.find("+IPD,"))
    {
      String action;
      
      Serial.println("+IPD, found");
      int connectionId = ESP8266.read()-48;
      Serial.println("connectionId: " + String(connectionId));
      
      ESP8266.find("led=");
      char s = ESP8266.read();
      if(s=='0'){
        action = "led=0";
        digitalWrite(LED, LOW);
      }else if(s=='1'){
        action = "led=1";
        digitalWrite(LED, HIGH);
      }else{
        action = "led=?";
      }
      
      Serial.println(action);
      sendHTTPResponse(connectionId, action);
      
      //Close TCP/UDP
      String cmdCIPCLOSE = "AT+CIPCLOSE="; 
      cmdCIPCLOSE += connectionId;
      sendESP8266Cmdln(cmdCIPCLOSE, 1000);
    }
  }
}

void sendHTTPResponse(int id, String content)
{
  String response;
  response = "HTTP/1.1 200 OK\r\n";
  response += "Content-Type: text/html; charset=UTF-8\r\n"; 
  response += "Content-Length: ";
  response += content.length();
  response += "\r\n";
  response +="Connection: close\r\n\r\n";
  response += content;

  String cmd = "AT+CIPSEND=";
  cmd += id;
  cmd += ",";
  cmd += response.length();
  
  Serial.println("--- AT+CIPSEND ---");
  sendESP8266Cmdln(cmd, 1000);
  
  Serial.println("--- data ---");
  sendESP8266Data(response, 1000);
}

boolean waitOKfromESP8266(int timeout)
{
  do{
    Serial.println("wait OK...");
    delay(1000);
    if(ESP8266.find("OK"))
    {
      return true;
    }

  }while((timeout--)>0);
  return false;
}

boolean cwJoinAP()
{
  String cmd="AT+CWJAP=\"" + SSID + "\",\"" + PASSWORD + "\"";
  ESP8266.println(cmd);
  return waitOKfromESP8266(10);
}

//Send command to ESP8266, assume OK, no error check
//wait some time and display respond
void sendESP8266Cmdln(String cmd, int waitTime)
{
  ESP8266.println(cmd);
  delay(waitTime);
  clearESP8266SerialBuffer();
}

//Basically same as sendESP8266Cmdln()
//But call ESP8266.print() instead of call ESP8266.println()
void sendESP8266Data(String data, int waitTime)
{
  ESP8266.print(data);
  delay(waitTime);
  clearESP8266SerialBuffer();
}

//Clear and display Serial Buffer for ESP8266
void clearESP8266SerialBuffer()
{
  Serial.println("= clearESP8266SerialBuffer() =");
  while (ESP8266.available() > 0) {
    char a = ESP8266.read();
    Serial.write(a);
  }
  Serial.println("==============================");
}


Saturday, May 2, 2015

Low cost ESP-12 (ESP8266 WiFi module)

It's ESP-12 (ESP8266 WiFi module) on breakout board, with all I/O pin accessible. Bought from China TaoBao (淘寶) market, cost RMB ¥15.00/pc :)

(have to solder the ESP-12 on breakout board by myself)


Test with example of "Arduino Due + ESP8266 - to Join AP".


My first exercise of using ESP-12:
Arduino Due + ESP8266: Web Control LED