Monday, May 18, 2020

ESP8266 (NodeMCU) - Get current weather data from OpenWeatherMap, using ArduinoJson

This exercise run on ESP8266 (NodeMCU), to get current weather data from OpenWeatherMap.


OpenWeatherMap provide easy-to-work weather APIs. Before you can use the APIs, you have to sign-up your account with email, for free.

After sign-up, and email varified, you can get various weather info using APIs with your api key. For example to get current weather:
http://api.openweathermap.org/data/2.5/weather?q=London,uk&APPID=<your key here>

This example with your api key will be sent you in the confirm email. You can paste it in browser, to receive the response in JSON form.


Copy the returned JSON to the input box in ArduinoJson Assistant, it will return you the Memory pool size, and example to Parsing program.


ArduinoJson is a simple and efficient JSON library for embedded C++. Support various platforms of Arduino framework. Already included in Platform IO.


For connection between ESP8266 and the I2C OLED, refer last post "ESP8266 (NodeMCU/ESP8266 DevKitC) + SSD1306 I2C OLED, Platform IO".

Here is my exercise run on ESP8266 (NodeMCU), to get current weather data from OpenWeatherMap, using libraries ESP8266WiFi, ESP8266HTTPClient, ArduinoJson, and display on I2C OLED using library ESP8266_SSD1306.

#include <Arduino.h>
#include "SSD1306Wire.h"
#include <ESP8266WiFi.h>
#include <ESP8266HTTPClient.h>
#include <ArduinoJson.h>

const char* ssid = "station";
const char* password = "password";

const String api_1 = "http://api.openweathermap.org/data/2.5/weather?q=";
const String qLocation = "London,uk";
const String api_2 = "&units=metric"; //request return temp in celsius
const String api_3 = "&APPID=";
const String api_key = "09816ba66b72ec172f3b8e1982c962ff";  //your api key
const String rqs = api_1 + qLocation + api_2 + api_3 + api_key;

SSD1306Wire  display(0x3c, D3, D5);

//Visit ArduinoJson Assistant (https://arduinojson.org/v6/assistant/)
//To get Memory pool size
StaticJsonDocument<800> doc;

void sendRqs(){

  HTTPClient http;
  http.begin(rqs);
  int httpCode = http.GET();

  if (httpCode > 0) { 

    String response = http.getString();
    //display.clear();
    //display.drawString(0, 0, "response:");
    //display.drawString(0, 10, response);
    //display.display();

    Serial.println(response);

    // Deserialize the JSON document
    DeserializationError error = deserializeJson(doc, response);

    // Test if parsing succeeds.
    if (error) {

      String errorStr = error.c_str();

      display.clear();
      display.drawString(0, 0, "deserializeJson() error:");
      display.drawString(0, 10, errorStr);
      display.display();

      Serial.println(errorStr);

      delay(10000);
    }else{
      Serial.println("deserializeJson() no error.");

      //--- Copy from ArduinoJson Assistant
      float coord_lon = doc["coord"]["lon"];
      float coord_lat = doc["coord"]["lat"];

      JsonObject weather_0 = doc["weather"][0];
      int weather_0_id = weather_0["id"];
      const char* weather_0_main = weather_0["main"];
      const char* weather_0_description = weather_0["description"];
      const char* weather_0_icon = weather_0["icon"];

      const char* base = doc["base"];

      JsonObject main = doc["main"];
      float main_temp = main["temp"];
      float main_feels_like = main["feels_like"];
      float main_temp_min = main["temp_min"];
      float main_temp_max = main["temp_max"];
      int main_pressure = main["pressure"];
      int main_humidity = main["humidity"];

      int visibility = doc["visibility"];

      float wind_speed = doc["wind"]["speed"];
      int wind_deg = doc["wind"]["deg"];

      int clouds_all = doc["clouds"]["all"];

      long dt = doc["dt"];

      JsonObject sys = doc["sys"];
      int sys_type = sys["type"];
      int sys_id = sys["id"];
      const char* sys_country = sys["country"];
      long sys_sunrise = sys["sunrise"];
      long sys_sunset = sys["sunset"];

      int timezone = doc["timezone"];
      long id = doc["id"];
      const char* name = doc["name"];
      int cod = doc["cod"];

      //--- End of ArduinoJson Assistant ---

      // Print values.
      Serial.println("temp_min: " + String(main_temp_min));
      Serial.println("temp_max: " + String(main_temp_max));

      display.clear();
      display.drawString(0, 0, name);
      display.drawString(0, 10, "temp_min: " + String(main_temp_min));
      display.drawString(0, 20, "temp_max: " + String(main_temp_max));

      display.display();
    }

  }else{
    display.clear();
    display.drawString(0, 0, "http.GET() == 0");
    display.display();
    Serial.println("http.GET() == 0");
  }
  
  http.end();   //Close connection

}

void setup() {

  Serial.begin(9600);

  display.init();
  display.setContrast(255);
  display.clear();

  display.drawString(0, 0, "ESP32/OLED");
  display.display();

  WiFi.begin(ssid, password);
  display.drawString(0, 10, "Connecting...");
  display.display();
  while (WiFi.status() != WL_CONNECTED) {
    delay(800);
  }
}

void loop() {
  display.clear();
  if (WiFi.status() == WL_CONNECTED) {
    display.drawString(0, 0, "CONNECTED");
    display.display();

    sendRqs();

  }else{
    display.drawString(0, 0, "NOT CONNECTED");
    display.display();
  }
  
  Serial.println("DONE");
  delay(10000);
}


Saturday, May 16, 2020

ESP8266 (NodeMCU/ESP8266 DevKitC) + SSD1306 I2C OLED, Platform IO.

NodeMCU + SSD1306 I2C OLED

Steps to new a PlatformIO project, for NodeMCU board of Arduino framework, using library and example of ESP8266_SSD1306, to display on I2C SSD1306 OLED display. Tested on Windows 10/VirtualBox.


- Connect NodeMCU to I2C SSD1306 OLED:


- Refer to previous post to Install VS Code/PlatformIO IDE on Ubuntu 20.04.

- Make sure the library ESP8266_SSD1306 is installed.


- Create a new project using NodeMCU board and Arduino framework.

- Open PlatformIO - Libraries page, copy example of ESP8266_SSD1306 library to our main.c.

- Edit platformio.ini to specify upload_port.

- Finally, Build and Upload. Done.


Espressif ESP8266 DevKitC + SSD1306 I2C OLED

Then I tried to test it on Espressif ESP8266 DevKitC, with module ESP-WROOM-02D.

It's found from ESP-WROOM-02D/02U Datasheet, I2C is assigned to IO14 (SCL), IO2 (SDA).


So I re-connect accordingly.

ESP8266 DevKitC <-> I2C SSD1306 OLED
3V3 - VCC
GND - GND
IO2 - SDA
IO14 - SCL

And edit main.c, change the code:

from:
SSD1306Wire  display(0x3c, D3, D5);

to:
SSD1306Wire  display(0x3c, 2, 14);


Re-build, and upload...done.


Next:
ESP8266 (NodeMCU) - Get current weather data from OpenWeatherMap, using ArduinoJson


Tuesday, May 12, 2020

New Espressif’s ESP development boards received, ESP32-S2, ESP32 aand ESP8266.

Just received ESP development boards from Espressif, ESP32-S2-Saola-1, ESP32-DevKitC V4, and ESP8266-DevKitC.


ESP32-S2-Saola-1 v1.2


ESP32-S2-Saola-1 is a small-sized ESP32-S2 based development board produced by Espressif. Most of the I/O pins are broken out to the pin headers on both sides for easy interfacing. Developers can either connect peripherals with jumper wires or mount ESP32-S2-Saola-1 on a breadboard.

To cover a wide range of users’ needs, ESP32-S2-Saola-1 supports:

  • ESP32-S2-WROVER
  • ESP32-S2-WROVER-I
  • ESP32-S2-WROOM
  • ESP32-S2-WROOM-I

The full model name of my board is ESP32-S2-Saola-1R, with chip embedded ESP32-S2-WROVER comes with a PCB antenna, 4 MB flash and 2 MB PSRAM.

reference:
ESP32-S2-Saola-1
- ESP32-S2-WROVER & ESP32-S2-WROVER-I Datasheet
- ESP32-S2-WROOM & ESP32-S2-WROOM-I Datasheet

ESP32-DevKitC V4


ESP32-DevKitC is an entry-level development board. It has all the ESP32 pins exposed and is easy to connect and use.

My board named ESP32-DevKitC-VE, with Module ESP32-WROVER-E, comes with a PCB antenna, 4 MB flash and 8MB PSRAM.

reference:
ESP32-DevKitC Overview
ESP32-DevKitC V4 Getting Started Guide
- ESP32-WROVER-E & ESP32-WROVER-IE Datasheet

next:
ESP32-DevKitC + 2.8inch 240x320 SPI TFT (ILI9341) using TFT_eSPI library

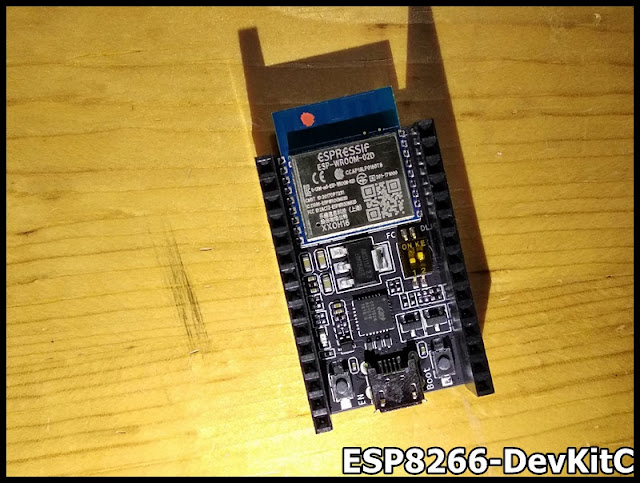
ESP8266-DevKitC


ESP8266-DevKitC is an Espressif compact development board based on ESP8266 modules. All of the I/O pins of the module are broken out to the female header connectors on both sides of the board for easy interfacing. Developers can connect these pins to peripherals as needed.

My board named ESP8266DevKitC-02D-F, with module ESP-WROOM-02D, come with female header.

referene:
- ESP8266-DevKitC Getting Started Guide
- ESP-WROOM-02D/02U Datasheet

Next:
ESP8266 (NodeMCU/ESP8266 DevKitC) + SSD1306 I2C OLED, Platform IO.


ESP32-S2 vs ESP32 vs ESP8266


(graph source: ESP32S2 tweet)

Friday, May 8, 2020

Install VS Code/PlatformIO IDE on Ubuntu 20.04, to program Arduino/ESP8266/STM32.

This video show how to install VS Code/PlatformIO IDE on Ubuntu 20.04 (run on Windows 10/VirtualBox), to program Arduino. And also set upload port in platformio.ini and add USB permission to user.


Visit Visual Studio Code download page to download .deb version for Ubuntu.

After downloaded, open Terminal and switch to the downloaded folder and run the command to install VS Code:

$ sudo apt install ./<file>.deb

(reference: Visual Studio Code on Linux)

After installed, search and run VSCode.

In VS Code, select Extensions tab, enter platformIo in the search box, and click to install platformIO IDE.


(This screen shot after PlatformIO IDE installed. Before install, you can see a Install button.)

If you report with error of ModuleNotFoundError: No module named 'distutils.***'

Enter the command to install python3-distutils:

$ sudo apt-get install python3-distutils

(reference: https://github.com/platformio/platformio-vscode-ide/issues/907)

Close and restart VS Code to complete installation.

Now you can select PlatformIO on the left, and create a New Project. For Arduino Uno, steps refer to the above video.

May be you have to specify the upload port in platformio.ini. Open platformio.ini and add the code:
upload_port = /dev/ttyACM0

where /dev/ttyACM0 is the USB port.

Also have to add permission of the USB port to user. Enter the command in Terminal:
$ sudo usermod -a -G dialout <username>
$ sudo chmod a+rw /dev/ttyACM0

more:
2.8" 320*240 TFT Touch Screen shield (ILI9341 8 bit I/F) on Uno, using MCUFRIEND_kbv and Adafruit GFX Libraries
TFT Touch Screen shield (ILI9341 8 bit) + Uno, calibration and simple touch drawing example.


Platform IO + ESP8266/ESP32

With PlatformIO IDE installed, you can also program ESP8266/ESP32 board of Arduino framework. This video show the steps.


The following video show how to install library in PlatformIO, for I2C SSD1306 OLED driver for ESP8266/ESP32.


This example run on ESP32 (WEMOS Lolin32 with integrated SSD1306/OLED driver).

#include <Wire.h>
#include <SSD1306Wire.h>

SSD1306Wire display(0x3C, 5, 4);

void setup() {
  // put your setup code here, to run once:

  display.init();
  display.flipScreenVertically();
  display.setTextAlignment(TEXT_ALIGN_LEFT);
  display.setFont(ArialMT_Plain_16);
}

void loop() {
  // put your main code here, to run repeatedly:

  display.clear();
  display.drawString(0, 0, "ESP32/OLED");
  display.drawString(0, 20, "Hello PlatformIO");
  display.display();

  delay(1000);
  
}


Reference:
~ My old post: ESP32 + OLED Module

Next:
ESP8266 (NodeMCU/ESP8266 DevKitC) + SSD1306 I2C OLED, Platform IO.


PlatformIO + STM32

PlatformIO also can program STM32, such as NUCLEO-F401RE Board.


KEY FEATURES of NUCLEO-F401RE Board:

- Common features
  • STM32 microcontroller in LQFP64 package
  • 1 user LED shared with Arduino™
  • 1 user and 1 reset push-buttons
  • 32.768 kHz crystal oscillator
  • Board connectors:Arduino™ Uno V3 expansion connectorST morpho extension pin headers for full access to all STM32 I/Os
  • Flexible power-supply options: ST-LINK, USB VBUS or external sources
  • On-board ST-LINK debugger/programmer with USB re-enumeration capability: mass storage, Virtual COM port and debug port
  • Comprehensive free software libraries and examples available with the STM32Cube MCU Package
  • Support of a wide choice of Integrated Development Environments (IDEs) including IAR™, Keil® and GCC-based IDEs

- NUCLEO-F401RE Board-specific features
  • External SMPS to generate Vcore logic supply
  • 24 MHz HSE
  • Board connectors:External SMPS experimentation dedicated connectorMicro-AB or Mini-AB USB connector for the ST-LINKMIPI® debug connector
  • Arm® Mbed Enabled™ compliant
Reference: NUCLEO-F401RE

Steps to create  a new project for NUCLEO-F401RE Board, using Arduino and Mbed framework.


Error: libusb_open() failed with LIBUSB_ERROR_ACCESS

To make PlatformIO run on Ubuntu, in addition to add USB permission to user as describe above, you have to install udev rules (99-platformio-udev.rules) also.

Enter the commands in Terminal:

$ curl -fsSL https://raw.githubusercontent.com/platformio/platformio-core/master/scripts/99-platformio-udev.rules | sudo tee /etc/udev/rules.d/99-platformio-udev.rules

$ sudo service udev restart

After this file is installed, physically unplug and reconnect your board.


Update VS Code for Ubuntu

If update of VS Code is available and you are asked to Download Update.


Just close VS Code and run the commands in Terminal:

$ sudo apt-get install apt-transport-https
$ sudo apt-get update
$ sudo apt-get install code # or code-insiders

reference: https://code.visualstudio.com/docs/setup/linux

Updated 1.46.0 currently@2020-06-11