Wednesday, February 27, 2013

Application Note of Cortex-M3 Embedded Software Development

The Arduino Due is a microcontroller board based on the Atmel SAM3X8E ARM Cortex-M3 CPU (datasheet). It is the first Arduino board based on a 32-bit ARM core microcontroller. The Application Note 179 Cortex™-M3 Embedded Software Development, from ARM Information Center, introduces the main features of the ARM Cortex™-M3 processor and describes different aspects of developing software for it. It also covers the migration of existing ARM projects to the Cortex-M3 platform. PDF version available at the bottom of the page.

Application Note of Cortex-M3 Embedded Software Development


Table of Contents
  • 1. The Cortex™-M3
    • 1.1. Nested Vectored Interrupt Controller (NVIC)
    • 1.2. Memory Protection Unit (MPU)
    • 1.3. Debug Access Port (DAP)
    • 1.4. Memory map
  • 2. Developing software for Cortex-M3
    • 2.1. Exception handling
    • 2.2. Memory Protection Unit (MPU)
    • 2.3. Stack and heap configuration
    • 2.4. Instruction set support
    • 2.5. Bit-banding
    • 2.6. Execution Modes
    • 2.7. Supervisor Calls (SVC)
    • 2.8. System Timer (SysTick)
    • 2.9. RVCT 3.0 Options
  • 3. Moving Existing ARM Projects to the Cortex-M3
    • 3.1. General code modifications
    • 3.2. Changes to startup code
    • 3.3. Changes to Exception Handling
    • 3.4. Retargeting for new device
    • 3.5. Exploiting new features of the Cortex-M3
  • 4. Debugging with the Cortex-M3


Tuesday, February 26, 2013

A tutorial of using Atmel Studio 6 with Arduino projects

It is a tutorial of using Atmel Studio 6 with Arduino projects, from engblaze.com. This article explains how to set up the Atmel Studio 6 IDE for use with Arduino projects, step-by-step. It also notes on general setup for working with Atmel devices, background on the pros/cons of working with AVR Studio, and a few other tips.

Table of contents:
  • Introduction
  • Preparing AVR Studio and the Arduino core library
  • Compiler and linker setup
  • Build your project
  • Flash!
  • Final notes
  • Further reading

Atmel Studio 6


Atmel® Studio 6 is the integrated development platform (IDP) for developing and debugging Atmel ARM® Cortex™-M and Atmel AVR® microcontroller- (MCU-) based applications. The Atmel Studio 6 IDP gives you a seamless and easy-to-use environment to write, build and debug your applications written in C/C++ or assembly code.

Atmel Studio 6 is free of charge and is integrated with the Atmel Software Framework (ASF)—a large library of free source code with 1,600 ARM and AVR project examples. ASF strengthens the IDP by providing, in the same environment, access to ready-to-use code that minimizes much of the low-level design required for projects. Use the IDP for our wide variety of AVR and ARM Cortex-M processor-based MCUs, including our broadened portfolio of Atmel SAM3 ARM Cortex-M3 and M4 Flash devices.

With the introduction of Atmel Gallery and Atmel Spaces, Atmel Studio 6 further simplifies embedded MCU designs to reduce development time and cost. Atmel Gallery is an online apps store for development tools and embedded software. Atmel Spaces is a cloud-based collaborative development workspace allowing you to host software and hardware projects targeting Atmel MCUs.

In summary, standard integrated development environments (IDEs) are suited for creating new software for an MCU project. By contrast, the Atmel Studio 6 IDP also:

  • Facilitates reuse of existing software and, by doing so, enables design differentiation.
  • Supports the product development process with easy access to integrated tools and software extensions through Atmel Gallery.

Introducing Atmel Studio 6: Two Architectures, One Studio


Monday, February 25, 2013

Hello World on Arduino Due, with message printed in Serial port

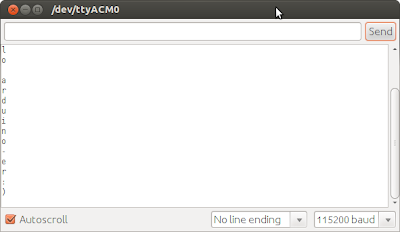
There are no display on Arduino board (Arduino Due in my case). We can display message on Arduino IDE's Tools of Serial Monitor, by print on Serial.

Hello World on Arduino Due, with message printed in Serial port.


void setup() {
  //Setup Serial Port with baud rate of 115200
  Serial.begin(115200);
  print("Hello World!");
}

void loop() {
  
}

void print(String s){
  Serial.print(s);
}


Arduino Due code example: Serial communication - Rx

Simple example run on Arduino Due to read data from Serial, then send back to Serial.

Arduino Due code example: Serial communication - Rx


void setup() {
  //Setup Serial Port with baud rate of 115200
  Serial.begin(115200);

}

void loop() {
  
  if(Serial.available() > 0){
    Serial.println((char)(Serial.read()));
  }

}


Sunday, February 24, 2013

Arduino Due code example: Serial communication - Tx

Simple example run on Arduino Due to send data via Serial, with baud rate of 115200.

#define MSG_SIZE 17

char hellomsg[MSG_SIZE] = {'H', 'e', 'l', 'l', 'o', ' ', 
  'A', 'r', 'd', 'u', 'i', 'n', 'o', '-', 'e', 'r', '!'};

void setup() {
  //Setup Serial Port with baud rate of 115200
  Serial.begin(115200);

}

void loop() {
  for(int i = 0; i < MSG_SIZE; i++){
    Serial.print(hellomsg[i]);
    delay[500];
  }
  
  Serial.println();
  delay(1000);
}

Friday, February 22, 2013

Missing component in Arduino Due

It seem that a component is missed on my new buy Arduino Due Board R3! Anybody can tell me what's it? it is necessary?

Missing component in Arduino Due


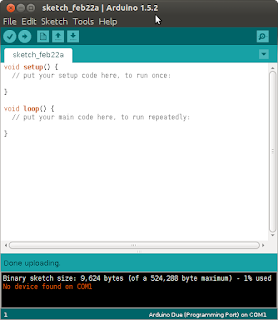
Arduino software on Ubuntu, with error of "No device found on COM1"

Just bought a Arduino Due Board R3, downloaded and installed Arduino 1.5 BETA on Ubuntu Linux to try it... happen the error of "No device found on COM1"! and cannot access the Serial Port option.

No device found on COM1

It's because you have no right to access USB port. The easiest and laziest solution is run android software with sudo.

$sudo ./arduino


Updated: HERE is another solution to run Arduino as normal user.


Wednesday, February 20, 2013

Atmospheric Monitoring with Arduino

Atmospheric Monitoring with Arduino


Makers around the globe are building low-cost devices to monitor the environment, and with this hands-on guide, so can you. Through succinct tutorials, illustrations, and clear step-by-step instructions, you’ll learn how to create gadgets for examining the quality of our atmosphere, using Arduino and several inexpensive sensors.
Detect harmful gases, dust particles such as smoke and smog, and upper atmospheric haze—substances and conditions that are often invisible to your senses. You’ll also discover how to use the scientific method to help you learn even more from your atmospheric tests.
  • Get up to speed on Arduino with a quick electronics primer
  • Build a tropospheric gas sensor to detect carbon monoxide, LPG, butane, methane, benzene, and many other gases
  • Create an LED Photometer to measure how much of the sun’s blue, green, and red light waves are penetrating the atmosphere
  • Build an LED sensitivity detector—and discover which light wavelengths each LED in your Photometer is receptive to
  • Learn how measuring light wavelengths lets you determine the amount of water vapor, ozone, and other substances in the atmosphere
  • Upload your data to Cosm and share it with others via the Internet
"The future will rely on citizen scientists collecting and analyzing their own data. The easy and fun gadgets in this book show everyone from Arduino beginners to experienced Makers how best to do that."


--Chris Anderson, Editor in Chief of Wired magazine, author of Makers: The New Industrial Revolution (Crown Business)


Make an Arduino-Controlled Robot

Make an Arduino-Controlled Robot


Building robots that sense and interact with their environment used to be tricky. Now, Arduino makes it easy. With this book and an Arduino microcontroller and software creation environment, you’ll learn how to build and program a robot that can roam around, sense its environment, and perform a wide variety of tasks. All you to get started with the fun projects is a little programming experience and a keen interest in electronics.

Make a robot that obeys your every command—or runs on its own.
Maybe you’re a teacher who wants to show students how to build devices that can move, sense, respond, and interact with the physical world. Or perhaps you’re a hobbyist looking for a robot companion to make your world a little more futuristic. WithMake an Arduino Controlled Robot, you’ll learn how to build and customize smart robots on wheels.

You will:
  • Explore robotics concepts like movement, obstacle detection, sensors, and remote control
  • Use Arduino to build two- and four-wheeled robots
  • Put your robot in motion with motor shields, servos, and DC motors
  • Work with distance sensors, infrared reflectance sensors, and remote control receivers
  • Understand how to program your robot to take on all kinds of real-world physical challenges


Interview with Massimo Banzi, Co-Founder of Arduino

Tuesday, February 19, 2013

Ubuntu for tablets announced

With unique multitasking productivity, effortless navigation and defence-ready security, Ubuntu raises the bar on tablet design and sets a new standard for the post-PC era. Bright. Brilliant. Beautiful. And naturally neat...source: http://www.ubuntu.com/devices/tablet


Monday, February 18, 2013

wikiHow - How to Write Arduino Software in C


How to Write Arduino Software in C

This tutorial from wikiHow will show you how to take full control of your arduino by showing you how to take the C++ code arduino provides you, and use (or modify) this code to create your own C++ programs for the arduino platforms, using the Eclipse C++ IDE, the AVR-GCC compiler, and AVRdude to download your programs to hardware

Arduino Playground - setup Eclipse to program Arduino in C/C++


Eclipse is a free, powerful, and full-featured development environment that can be set up to work with AVR and Arduino. This page explains how to setup Eclipse with WinAVR and the Eclipse plugin AVR-eclipse.

The playground is a publicly-editable wiki about Arduino.

Sunday, February 17, 2013

Arduino Due with ARM Cortex-M3 explained by Massimo Banzi, Co-founder of Arduino


Arduino Due Board

Arduino Due Board
Arduino Due Board

  • AT91SAM3X8E ARM 32-bit Microcontroller @ 84MHz
  • Operating Voltage: 3.3V
  • 54 digital I/O pins, 12 analog inputs, 2 DAC (analog output)
  • Flash Memory: 512 KB all available for the user applications
  • SRAM: 96 KB (two banks: 64KB and 32KB)

The Arduino Due is the newcomer microcontroller board in the Arduino boards family. It's the first board based on a 32 bit ARM core processor, the Atmel SAM3X8E ARM Cortex-M3 MCU, that improve all the standard Arduino functionalities and add more new features. It offer 54 digital input/output pins (of which 12 can be used as PWM outputs, with selectable resolution), 12 analog inputs with 12 bit of resolution, 4 UARTs (hardware serial ports), and two DAC outputs (digital to analog converter), 84 MHz crystal oscillator, two USB connections, a power jack, an ICSP header, a JTAG header, and a reset button. The maximum voltage that the I/O pins can provide or tolerate is 3.3V. Providing higher voltages, like 5V to an input pin could damage the board. The Due has two usb connectors, the one with the micro-usb AB connector is the native one capable to act as an USB host, that means you can connect compatible external usb peripherals to the board, such as mouse, keyboards, smartphones. While the other USB port with the type B connector is intended for debugging purposes. Technical Specifications Microcontroller AT91SAM3X8E Operating Voltage 3.3V Input Voltage (recommended) 7-12V Input Voltage (limits) 6-20V Digital I/O Pins 54 (of which 12 provide PWM output) Analog Input Pins 12 Analog Outputs Pins 2 (DAC) Total DC Output Current on all I/O lines 130 mA DC Current for 3.3V Pin 800 mA DC Current for 5V Pin 800 mA SRAM 96 KB (64 + 32 KB) Clock Speed 84 MHz

Fritzing: an Electronic Design Automation software

Fritzing is an open-source initiative to support designers, artists, researchers and hobbyists to take the step from physical prototyping to actual product. We are creating this software in the spirit of Processing and Arduino, developing a tool that allows users to document their Arduino and other electronic-based prototypes, and to create a PCB layout for manufacturing. The complementing website helps users to share and discuss drafts and experiences as well as to reduce manufacturing costs.

Fritzing is essentially an Electronic Design Automation software with a low entry barrier, suited for the needs of designers and artists. It uses the metaphor of the breadboard, so that it is easy to transfer your hardware sketch to the software. From there it is possible to create PCB layouts for turning it into a robust PCB yourself or by help of a manufacturer.

Why Fritzing is needed
Physical prototyping tools have come a long way and already allow non-engineers to quickly turn their ideas into functional interactive prototypes. However, the prototypes in this stage are still raw and not robust. This is where Fritzing comes in: It allows the designer to move to the next stage and create a finished PCB of your individual circuit in the desired shape. This makes the circuit robust and is the basis for a permanent installation or even batch production of your project.


An Introduction to Fritzing

Friday, February 15, 2013

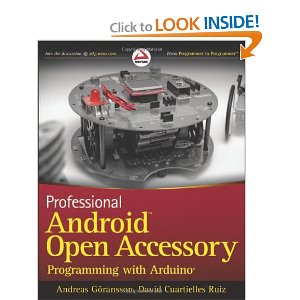
Professional Android Open Accessory Programming with Arduino

Professional Android Open Accessory Programming with Arduino


Learn how to control your home or car from your Android smartphone - air conditioning, lights, entertainment systems, and more!
Android Open Accessory is a new, simple, and secure protocol for connecting any microcontroller-empowered device to an Android smartphone or tablet. This Wrox guide shows Android programmers how to use AOA with Arduino, the microcontroller platform, to control such systems as lighting, air conditioning, and entertainment systems from Android devices. Furthermore, it teaches the circuit-building skills needed to create games and practical products that also take advantage of Android technology.
  • Introduces Android Open Accessory and shows how to set up the hardware and development environment
  • Explains how to code both Android and Arduino elements of an accessory
  • Features four complete projects developers can build using various sensors and indicators/actuators, including source code
  • Gives Android developers the tools to create powerful, sophisticated projects
Professional Android Open Accessory with Android ADK and Arduino opens exciting new opportunities for Android developers.

Arduino MEGA ADK R3 for Android

Arduino MEGA ADK R3 for Android

  • The Arduino ADK is a microcontroller board based on the ATmega2560
  • It has a USB host interface to connect with Android based phones, based on the MAX3421e IC
  • For information on using the board with the Android OS, see Google's ADK documentation.
  • Android Development Board
  • R3 board

Thursday, February 14, 2013

About Android Open Accessory

Android Open Accessory support allows external USB hardware (an Android USB accessory) to interact with an Android-powered device in a special accessory mode. When an Android-powered powered device is in accessory mode, the connected accessory acts as the USB host (powers the bus and enumerates devices) and the Android-powered device acts in the USB accessory role. Android USB accessories are specifically designed to attach to Android-powered devices and adhere to the Android Open Accessory Protocol, that allows them to detect Android-powered devices that support accessory mode. Accessories must also provide 500mA at 5V for charging power. Many previously released Android-powered devices are only capable of acting as a USB device and cannot initiate connections with external USB devices. Android Open Accessory support overcomes this limitation and allows you to build accessories that can interact with an assortment of Android-powered devices by allowing the accessory to initiate the connection.

Note: Accessory mode is ultimately dependent on the device's hardware and not all devices support accessory mode. Devices that support accessory mode can be filtered using a element in your corresponding application's Android manifest. For more information, see the USB Accessory developer guide.

Android Open Accessory support is included in Android 3.1 (API Level 12) and higher, and supported through an Add-On Library in Android 2.3.4 (API Level 10) and higher.

An Introduction to the Arduino


Wednesday, February 13, 2013

About Arduino

Arduino is an open-source electronics prototyping platform based on flexible, easy-to-use hardware and software. It's intended for artists, designers, hobbyists, and anyone interested in creating interactive objects or environments.

Arduino-er Pre-start


I'm prepare to start learning development for Arduino, just do new this blogspot (arduino-er.blogspot.com) as a notice.